

Frequently asked Questions!
These ‘questions’ and replies are the result of many years’ workshop and boating experience. I cannot promise that I can cure every ill, but maybe I can help, if only by stopping an owner doing something that might damage their motor. However I suggest you use all these suggestions at your own risk, as I have no control over how you are going to do things in your back yard. Some of these comments have already appeared in print in the ‘British Seagull’ owner’s magazine, and in the early service manuals and handbooks. Some have been printed in the Yachting press, as the result of interviews with me. Some of the tips have come from ex workers at British Seagull and ex directors, others from enthusiastic owners.
These pages are free to all to look at, no registration or membership needed. Please feel free to pass these FAQ on to others, with my name on it: However, please don’t do as one Australian dealer and others have done, just use it as his own... Needless to say he will not be found on the links page.
Any other queries? Please e-mail me and perhaps I can add yours to the list for others.
Let’s keep those trusty ‘British Seagulls’ going!!
Can I use unleaded fuel ?
can I use any type of 2 stroke oil ?
Can I use less than a 10 to 1 fuel mixture ?
How do I know if my motor has been converted to 25:1?
Bing carbs, what mix do they have to have? The Fuel cap has 10:1 on it?
I can't see my carb shown anywhere?
My motor says I can run it on 50:1, is that right?
What Oil should be in my gearbox, it looks like coffee coloured sludge?
I have seen somewhere that you must not use EP oils in British Seagulls, is that right?
My seagull book says to use 90-grade oil?
My fuel tap is leaking, Do I need a new one ?
My carb is all bunged up with goo!!!
I have problems getting water to circulate when I test in the tub.
What are the holes in the exhaust tube for ?
My British Seagull runs for 15 minutes then loses power, slowing to a stop. It is not seized.
Why does my carb leak when I tilt the motor on arrival at the shore?
Motors been laid up for a while in my shed and now it won’t fire up.
How best to clean the bronze bracket parts of my British Seagull?
What puller should I use to remove the flywheel ?
How do I change the timing?
The points setting printed on my engine is less than 20 thou, why?
Should the setting on my plug be 25 thou, as it says in my hand book?
I am getting a spark, but only a very weak one, should I replace the coil
I have no spark at all, is my coil dead, how do I test it?
Everything is set OK, it is a points ign motor, but I still get odd misfires?
The cup washer has fallen off my clamp bracket screw, and though I have a new cup washer from you, cheap, there is little left to fix it too!
Do you have better Stainless thumbscrews?
Are there stainless nuts and bolts etc available?
Why should the gear change on my FNR model keep jamming?
Can I fit a recoil start to my ‘British Seagull’?
My engine number does not appear to be correct for what my engine is?
My fuel tank is badly dented, how can I repair it?
How do I winterise my Seagull ?
The engine goes OK but the prop does not drive the boat, except at snails pace?
I want to make my British Seagull look as good as new, but the transfer lets it down, any chance of any Decals?
There used to be covers available, are they still?
Beware of non-standard starter ropes !
How do I clean the bronze and brass parts without damaging them?
Are there any manuals available ?
Below are a few links to Paul's U-Tube videos, these and many others you see on there may assist you.. But beware, some have odd advice on them.. check with me.
https://www.youtube.com/watch?v=stJmByJgdAs https://www.youtube.com/watch?v=KJQRbjpg9tY https://www.youtube.com/watch?v=DOLtCnFTyKo https://www.youtube.com/watch?v=ati7UA0jRz0How do I start my British Seagull?
Motor cold.
Release the air bleed screw on the filler cap a half turn.
Pull open fuel tap.
Close choke. (restricting air supply)
Press 'tickler' on carb till fuel just spills out.
Open throttle to full. (frequent usage may allow you to determine that you can use less throttle to start.)
Ensure motor in neutral, if clutch or gears fitted.
Wrap pull cord 3 times round rope pull, clockwise.
(Move crew away from just behind you!)
Steady tank with left hand and give steady but sharp pull on rope. (turning flywheel clockwise).
Motor should start on 2nd pull.
If not started after 4 pulls look to see what you forgot!
If nothing seems amiss, check plug to ensure you have spark, see if plug wet...
Make sure fuel is less than 3 months old and correctly mixed, either 10:1 or 25:1. depending on age of British Seagull. Never less than 25:1 though!!
If motor has not been started in many a month, try 'super flooding' by simply placing cloth in your hand, over the carb intake, thus injecting copious amounts of fuel, and lubricating/sealing dry bearing surfaces.
Whip rag away when it fires!
As soon as motor fires up, shut throttle down to avoid racing and open choke as soon as you can, normally within seconds....
Check for coolant flow. (should be the thickness of pencil, dropping back to the water.)
(If motor hot, do not flood to start.)
To STOP! You should simply be able to close the throttle! If you cannot the cable needs adjusting! (OK, if you do happen to have a QB, it has a stop button!)
Can my seagull run safely on unleaded?
Yes, it should be on unleaded. When seagulls were first designed in the very late 1920's,there was very little lead in fuel at all. Lead was added for performance and lubrication. British Seagulls do not have high compressions so don’t want it for performance! As for lubrication there is enough with good two-stroke oil.
Can I use any two-stroke oil?
No. Use oil for outboards. TCW3 grade is best TCW2 will do. The reason for the difference between oil for mowers, motorcycles and the like, is the operating temperatures. British Seagulls run quite cool, so the oil has to work at relatively low temperatures. Incidentally there are bio-degradable two-stroke oils available now too. Do not be tempted to run the motor at less than 25:1 though, what ever they claim, it needs the oil to seal the crankcase.
Can I run on less than 10 to 1?
Perhaps All motors after January 1978 left the factory with 25:1 conversions. Most models built after 1967 can be converted to 25:1. I have a stock of 25:1 needles for the Villiers conversions £6.00 plus postage. I also have conversion jets for the Amal 2 jet carbs, £6.50 plus postage.
Prior to 1968, engines had slightly different bearings and it is recommended to stay on 10:1, though I know of quite a few that have been running on 25:1 for years, with no apparent problems. However see further down the page for how to run on less oil without changing needle...
Later Villiers simply needed a new needle.

The Amal two jet needs the power jet changing to a smaller size. (40). See below for how to make a suitable box spanner or I sometimes have them for £2.00!
Incidentally the Bing carbs will run OK on 25:1 without any change.
As do the later 400 Series Amal carbs. They were set to 25:1 at the factory.

How to convert a Villiers Carb, without changing the needle.
(I do have the Villiers conversion needle, for post 1967 motors. £7.30)
I have been informed by the company that has taken over Villiers, that it is possible to alter the fuel mix from 10:1 without changing the No 3 Needle. They suggest it is possible to reduce the mix as far as 20:1, with a little trial and error. The method is simple. The securing screw for the needle may be lowered up to 3 turns, no more, from level with the top of the slide. It is possible that this will not work on all motors and indeed the best you may achieve is 16:1, but even that is better than 10:1! I can imagine it will take a little while to find a 'happy' mix for engines, but at least there is an alternative.
Bear in mind 25:1 should only be for post 1967 motors due to the earlier models having slightly shorter bearings, and needing the heavier oil mix to seal the crankcase, (having said that some have run on less for years and are happy with it?) Older motors, with appreciable wear, have been found to be ‘unhappy’ at the leaner oil mix. I believe this is because the oil acts as a seal on the main crank bearings, and with age and wear, the thinner oil is insufficient. As a result air can be sucked into the crankcase, casing a weak mixture and irregular running.
How do I know if my motor has been converted to 25:1?
If you have a Villiers carb, undo the knurled top ring and remove cable and throttle slide. Remove small securing screw in centre and push up needle, pull down small spring to reveal tiny number stamped in side of needle. You will need a young pair of eyes and probably a strong magnifying glass!
No 3 is 10:1
No 2 or '2 & 1/2%' (or a needle with nothing on it at all!) All are converted 25:1.
I have the new Villiers conversion needle. £6.50 each! (The new ones have no number on them!!!)
Replace needle ensuring securing screw is refitted with top flush with top of slide, or max one turn down, (which weakens mixture!).
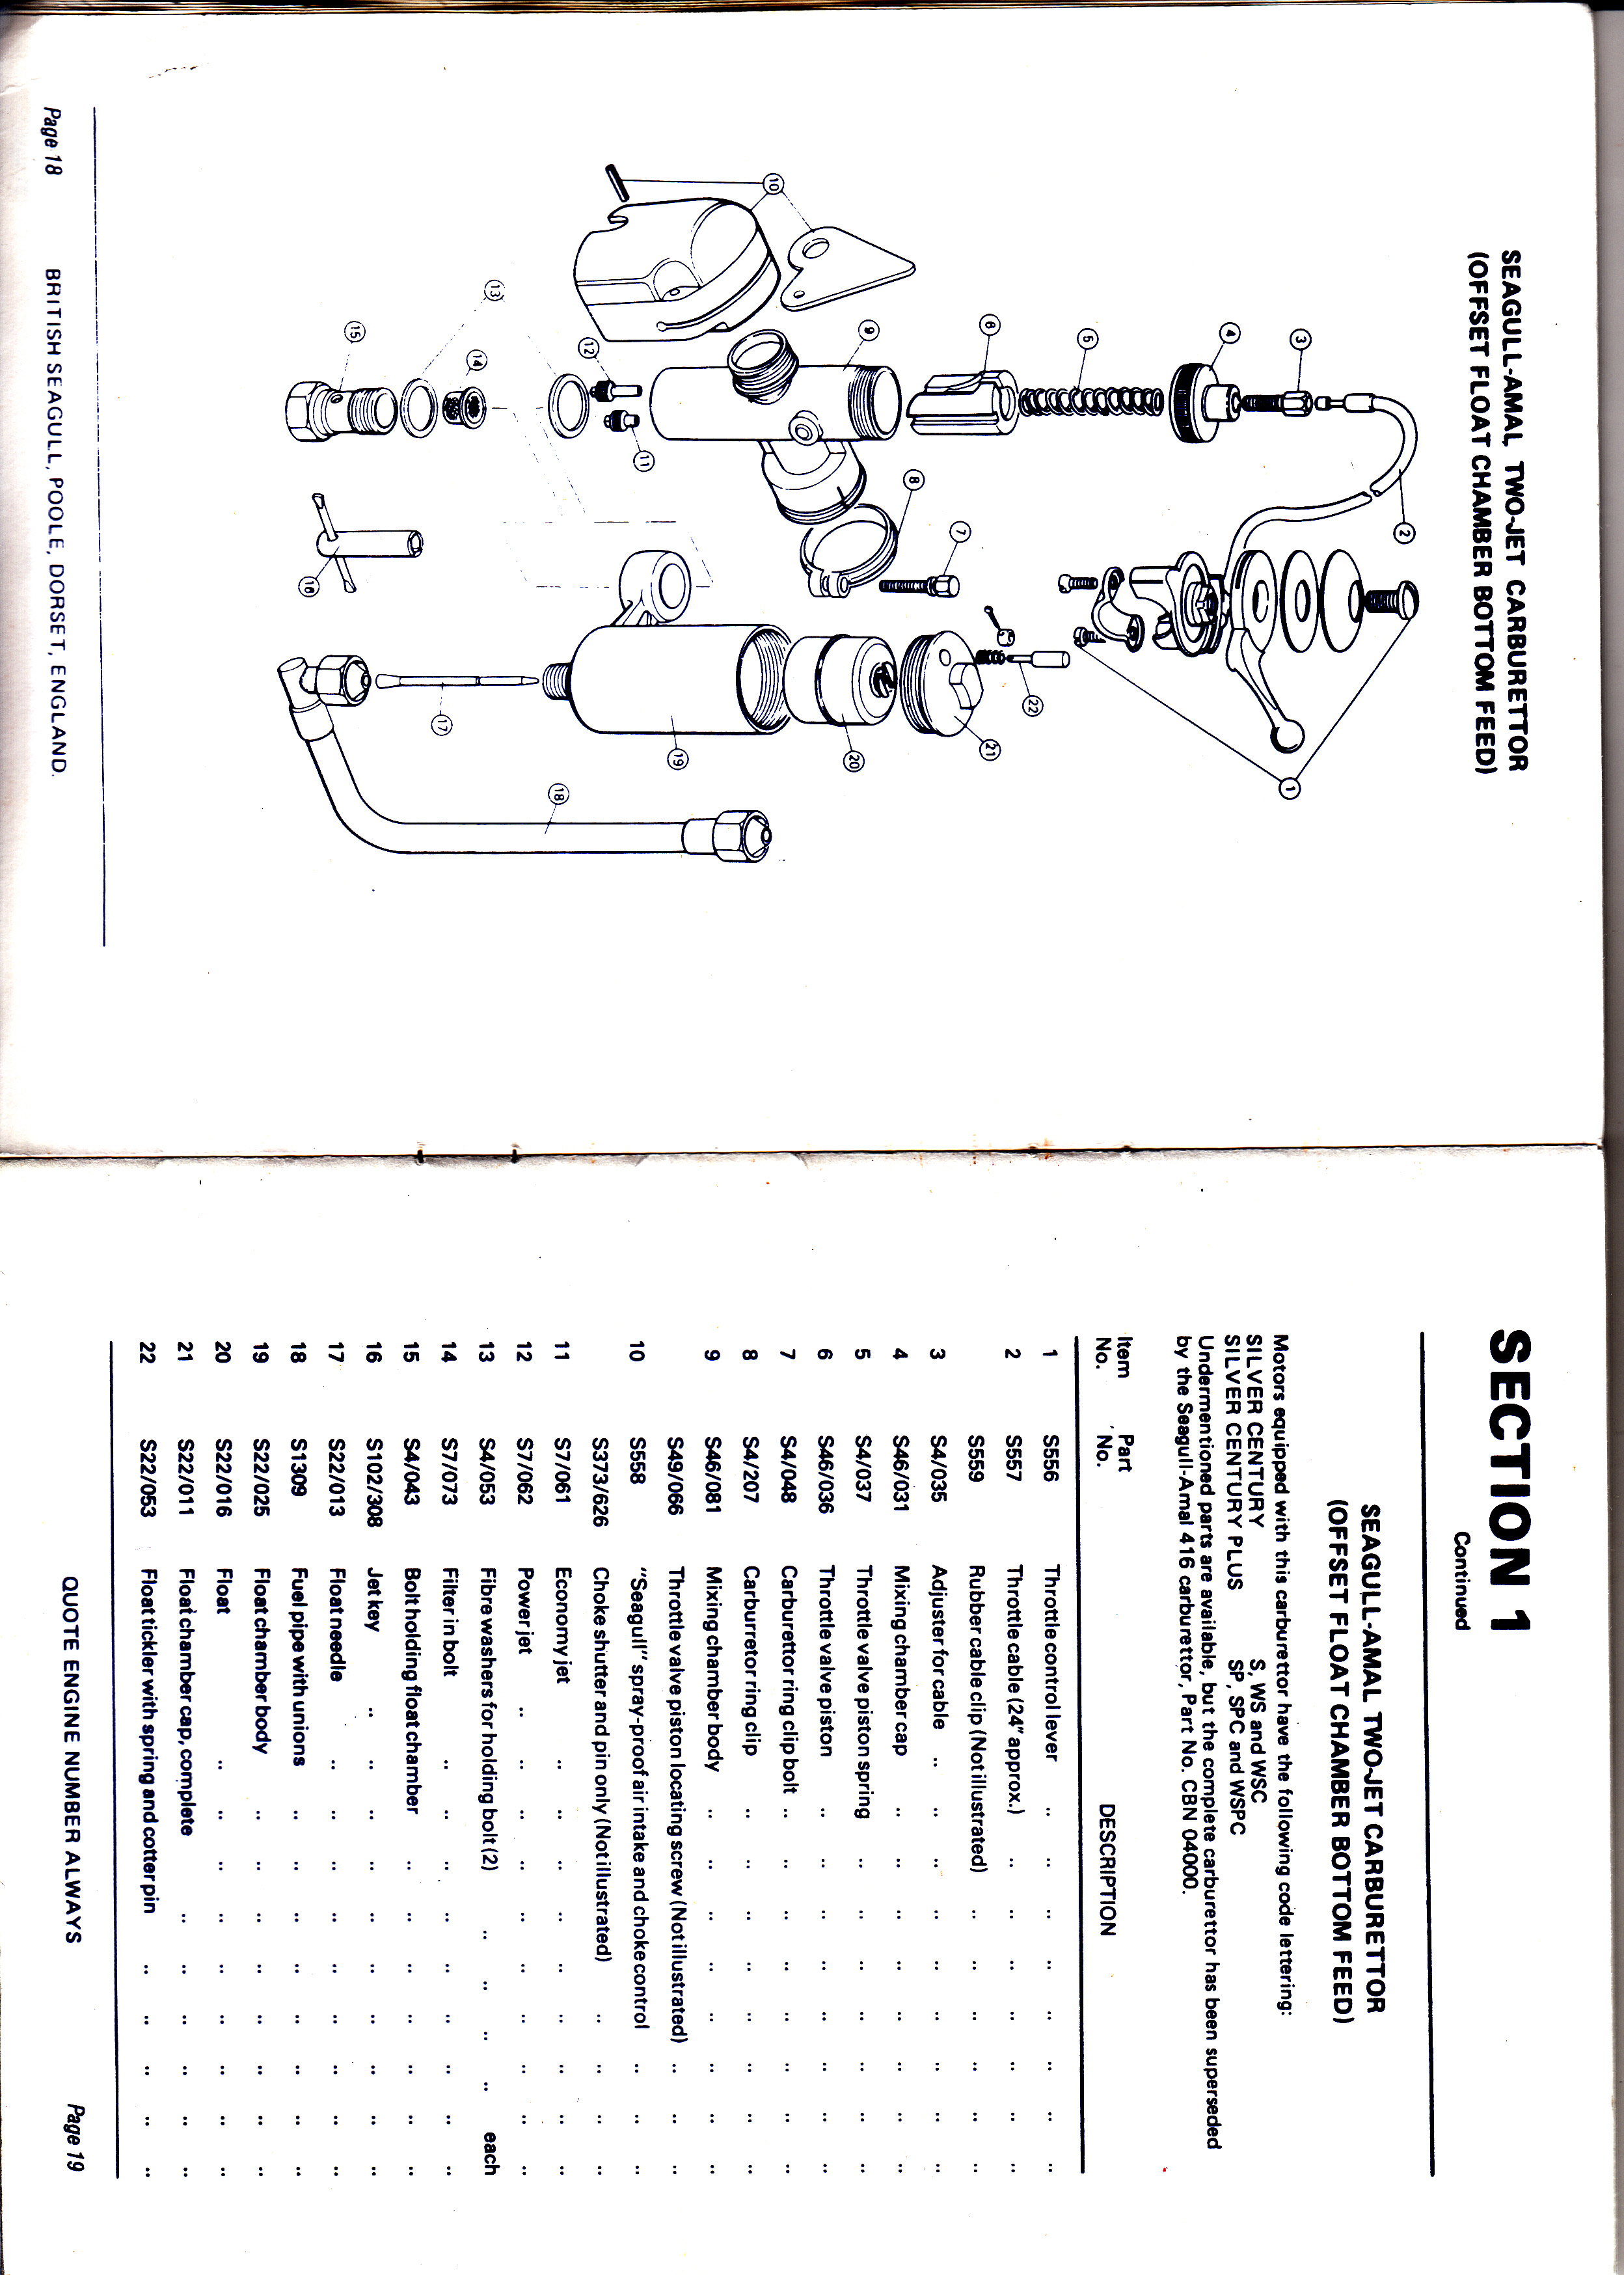
In the case of the Amal 2 jet carb, you need a tiny box spanner or socket. British Seagull used to sell a tiny 5mm square box spanner, sadly no longer, so you might have to make one from a domestic radiator key or a length of old brake pipe, squared off!
Undo large bolt securing float to body of carb. Might be easier to remove whole carb to do this, as you now have to go into the bottom of the carb body and remove the large jet. Be very careful with the thread securing that bolt. They do suffer from corrosion if the carb has salt in it. If they go they are a pain as there are no new bodies available. Some have sleeved and rethreaded them, but it is difficult. Just make sure it is clean and do not over tighten!
Remove the brass jet and look for the number stamped on it.
40 is converted 25:1
45 or 50 is 10:1 still.
The conversion jet no longer comes with a box spanner, not a lot of help. If you do not know if you have a converted engine and have no suitable square spanner to get the original jet out then a pair of long nosed pliers may do the job, but do not damage the thread on the base of that body!!!!
Amal 2 Jet carb bodies are as rare as hen's teeth on my spares shelf...... As the British Seagull box spanner is no longer available, a useful alternative is a length of old brake pipe, squared off by inserting a tapered square punch, or nipping in the vice, either bend the top to make a handle or drill a tiny hole across it to put a rod in as a handle......
I am indebted to Peter, (40TPI on the Forum!) who has taken me at my word when I said that a radiator key was about the right size, he went right out and modified one to make the shaft longer, so it could reach! As you can see it works! You still have to be so careful not to damage the threads in the bottom of the carb body.
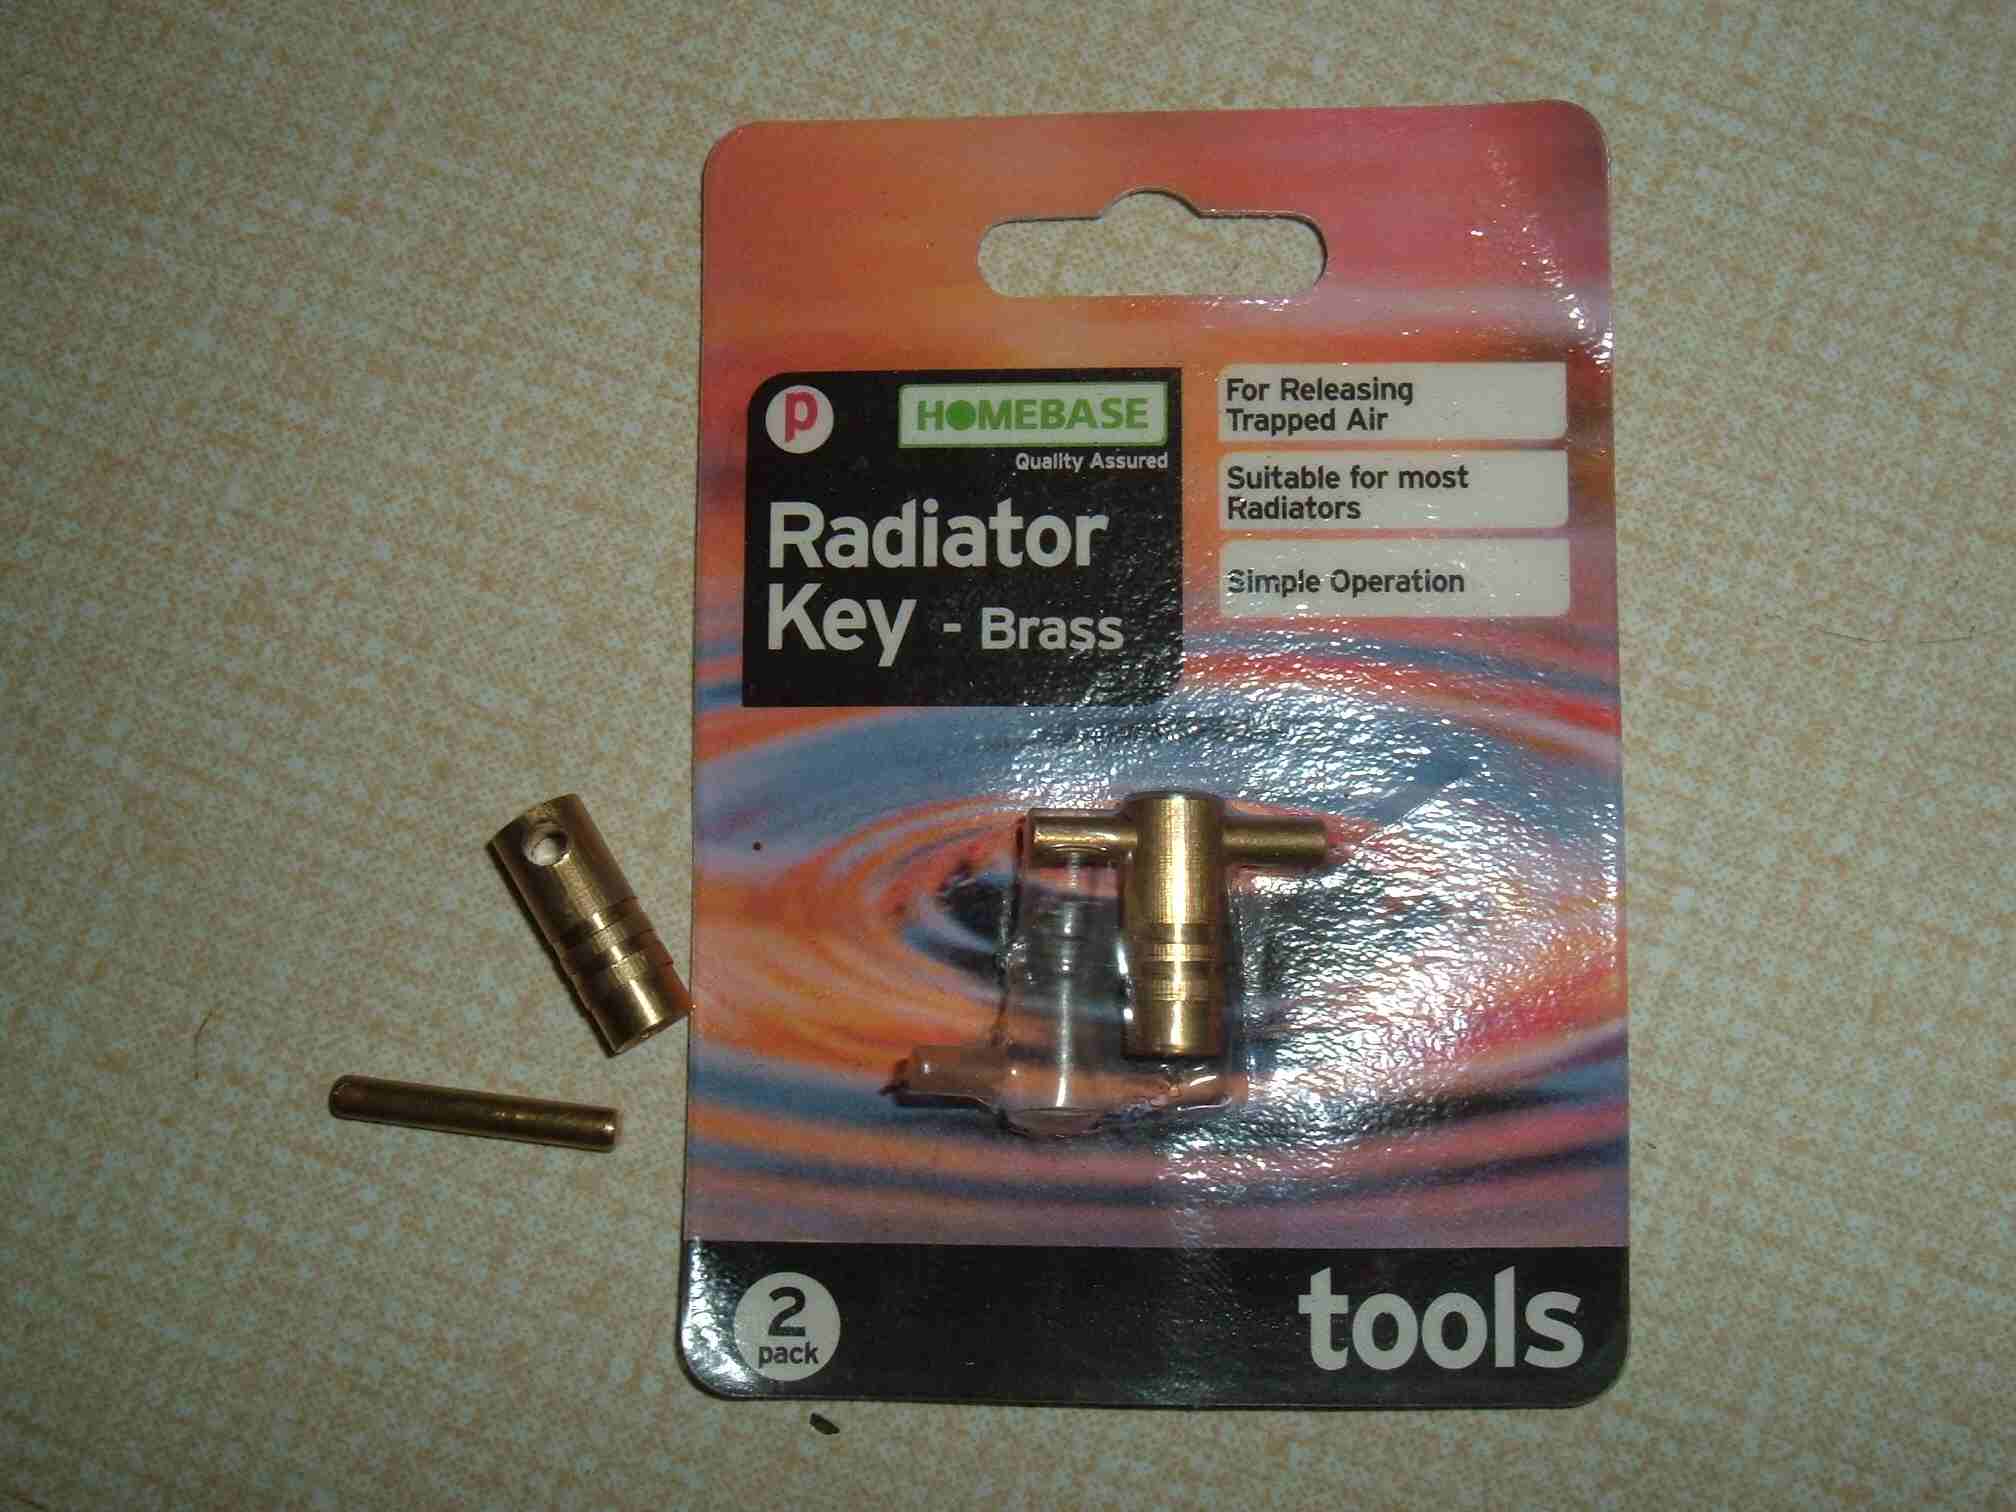
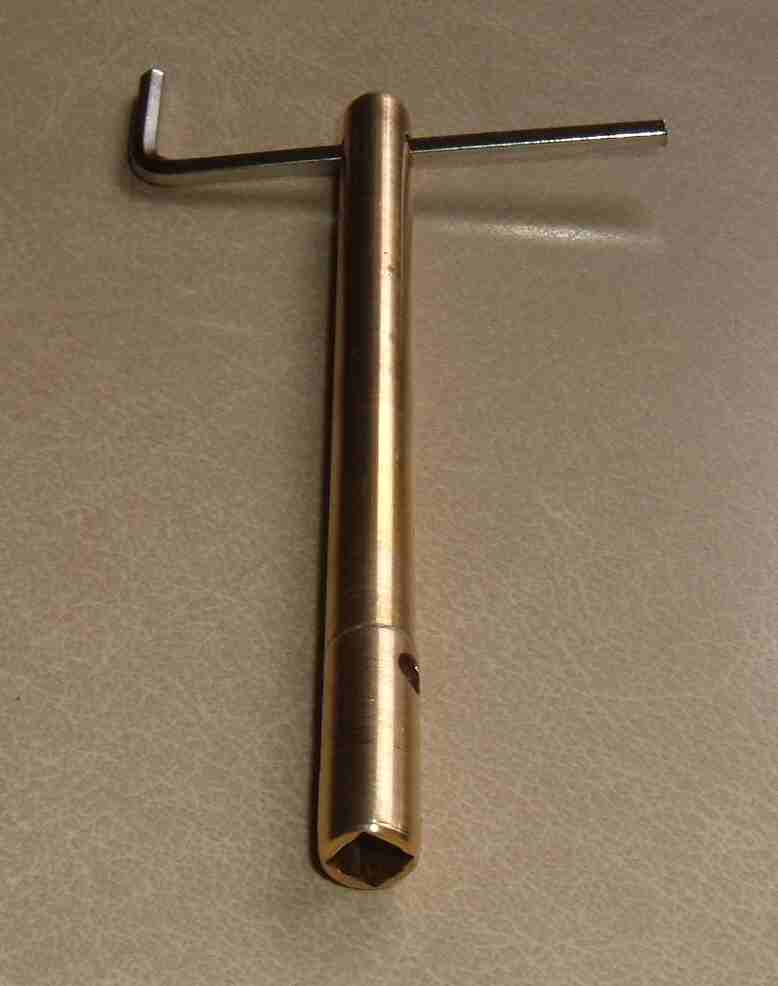
You can even see the store he bought it in! Thanks Peter!
I had keys manufactured for me £2.00 a time. However recently, July 2012, Stephen Dunn has sent me a few radiator keys he found, they are short with a cross bas handle that can be knocked out and a screwdriver slot can be cut in the domed top, to make them work. So I have bought a load and will include them with the Amal 25:1 kit
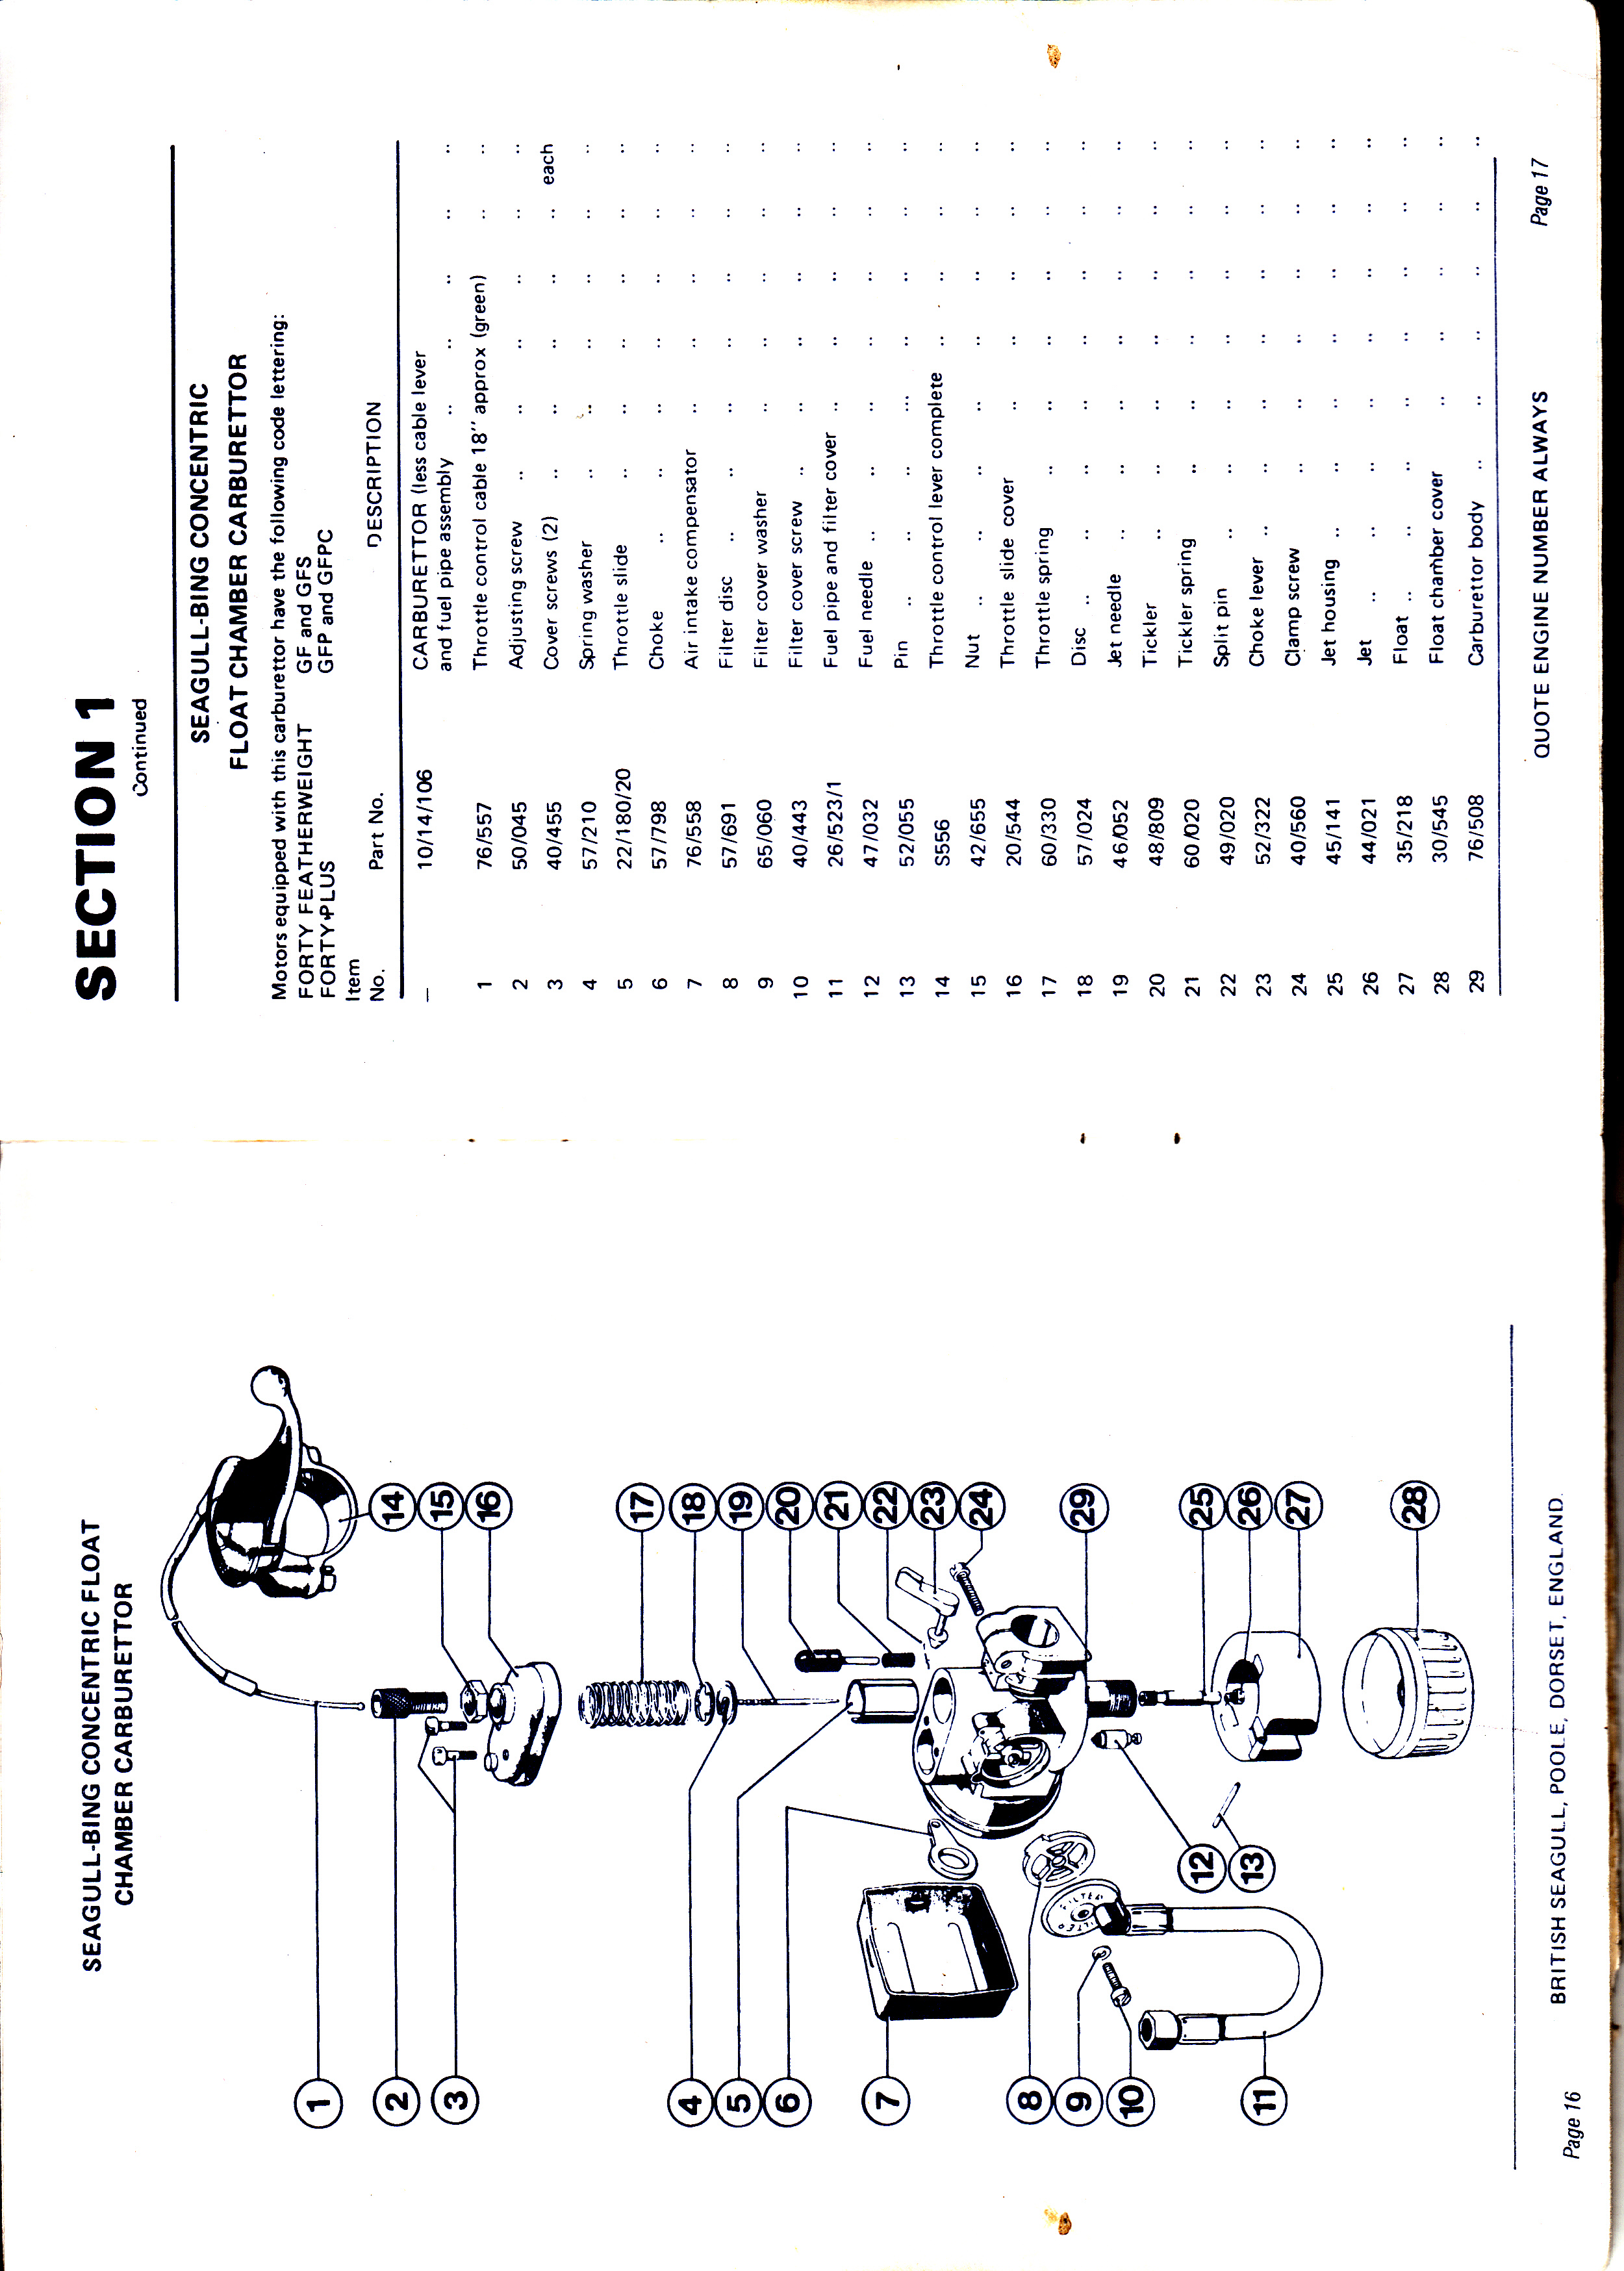
Bing carbs, what mix do they have to have? The Fuel cap has 10:1 on it???
All the Bing carbs can run on 25:1 with no modification. No idea how they do it, but they do!
I can't see my carb shown anywhere?
It is possible you might have a 'Seamal'. this carb was listed by British Seagull in the late 1960's, however no parts are now available and to be honest, I have never come across one.
August 2006. I have now found out that the Seamal was never fitted to British Seagulls. The stock was destroyed, all but one carb that is! However the booklets had already gone out!
So if your carb is different from the ones here, it is not a British Seagull one!
My motor says I can run it on 50:1, is that right?
Yes, and No. Late, 1990 models were sold with the fuel mix quoted as 50:1. Subsequent testing proved that this was ill advised and I would not recommend less than 25:1, with good outboard oil, whatever the model. They self destructed! Stick to 25:1!!
What Oil should be in my gearbox, it looks like coffee coloured sludge?
If your gearbox has a mixture of oil and water in a grey/brown slurry, that’s healthy!
The gearboxes on most seagulls have no proper oil seals, just a rubber grit seal. The oil will leak out and water get in. They are designed to run on an emulsion of oil and water. However, there comes a time when the water content is too high, so if it is inspected every 10 hours use and found watery, replace it with 140 grade oil. It’s a lot cheaper than replacing the gears.
I find horror stories in gearboxes. Full of water or dry, full of dust, rust and salt crystals, or even worse packed with grease…. The grease moves over to let the water in and hey presto, no case hardening, no gears!
There is an exception to this apparently. The very early model 102s used a sort of runny grease, thus the grease nipples on the boxes. The earliest ones had proper grease nipples, the ones that a grease gun would clip onto, for these boxes it might be possible to use 250 grade oil and grease mixed. The later oil nipples should use 140, but if it leaks out try 250 grade.
The nylon plug on the front of the gearbox is the drain, the filler and, when the engine is upright, the level plug. Do not overfill gearbox, it will only leak out and in some cases prevent clutches from working!
Make sure you use the right oil. 140 grade, either straight or EP type is OK to be used by most British Seagulls. I do have it here, 1 Litre for £7.50, but as it costs £4.00 postage for 1 litre posted to a UK address, it is better to try and source it locally. Look in your Yellow Pages for you local agricultural merchant. They sometimes will have small, 500ml bottles on the shelf. Other times you may have to buy 5 Litres (Lots of old farm machinery still uses this grade, fortunately.) See the links page for other Oil firms.
I have seen somewhere that you must not use EP oils in British Seagulls, is that right?
No. EP 140 and EP 90 oils do have additives that can harm bronze bearings in some engines, but only if they get really hot. As British Seagull gearboxes are working underwater they are super cooled and I have never had a problem with EP oils. More problems using from thinner grades or no oil!
I even have old 'British Seagull' oil bottles in my collection clearly labelled EP!
There is a guy in Oxfordshire claiming that British Seagull oil has to be non EP, and more or less slating 'other websites' for selling EP oil, quoting the oft misquoted reason of the additives eating bronze bearings. What total cods!! If he cared enough to research, he would realise it was only a problem in hot oil applications... Ever seen a British Seagull gearbox that was not super water cooled! British Seagull did their homework, they knew.....

Above is a picture of a genuine British Seagull bottle from my museum, yes it does read EP 90..
Sadly I did not keep the old EP140 tin, yes tin...
I suspect the chap selling on EBay has just got a load of 140 to get rid of, but hang on, he is selling it for £8.99 for 500ml instead of my £7.50 for a Litre!! You can use either, but mine is so much cheaper! Wow that makes his twice the price of mine......That is daylight robbery!
My seagull book says to use 90-grade oil?![]()
Yes, certain later seagulls, with FNR gears and others with clutches and lip seals fitted, did use 90 grade oil. However, still check every 10 hours use or so. It is not unknown for those seals to go, what with all the salt and sand around them. It is still cheaper to put fresh oil in than change the gears. If you find that the oil is emulsifying, then put in 140-grade oil till you can replace the seals. (There was also a sealed gearbox on some later Featherweights, the tell-tale is a small screw on the casing, just above the top gearbox cap screw).
My fuel tap leaks, do I need a new one?
No, I doubt it. I expect the tank is empty and the cork has dried out. First Aid. Remove the small screw carefully in the side of the tap, (brass taps, not plastic ones!), take out the plunger with the cork on it. If it has not badly split, place it in an old cup and pour boiling water on it!!! Or better still put it in 3" of water in an old pan and boil it for 15 minutes. The effect is to soften and swell the cork. After 15 minutes or so remove it and dry it, then grease it and replace. That should fix it.
There is a repair kit available if this fails, with instructions on how to get the thing apart!

To prevent it happening in the first place I have a simple method.
At the end of the season drain the carb and the tank, to prevent sludging. Take the cork plunger out of the tap and put it into a small plastic bag, with a teaspoon full of oil, tie it to the fuel line. Next season, replace oiled cork into tap, fill with fresh fuel and off you go!
I am indebted to Kevin Richards for this tip, if you lose the tiny screw, look in some old 3 pin 13 amp plugs, you could find a replacement in there! Maybe will not have the narrower tip, but will get you out of trouble!
My carb is all bunged up with goo!!!
Very descriptive, know exactly what you have, and it is a nuisance. Modern fuel has so many different additives to it. A knowledgeable soul once informed me that for every 5 Litres of fuel we buy at the pump, we get half a Litre of what he called ’Volatile Aromatics’. Sadly this is what evaporates off first, and is what we need to get the bang out of our motors. So after as little as three months, if the top has been undone, or the air vent, we might have lost the ‘good’ part of the fuel. Worst still, what is left will then turn slowly to a varnish like substance that coats everything, blocking jets and the like. Even if your jets do not block, you may be unable to start the motor. Fresh fuel often will start to clear it, but more often than not it will need a messy strip down. I advise draining tanks at the end of the season, see advice on corks above.
Further to this I have had to tell a lot of owners this tip, so here goes.
The villiers carb centre brass jet comes apart. There are flats to take a 10mm spanner about an inch or so up from the bottom, it unscrews revealing a smaller jet, off set towards the air intake side of cab. This has a 90 degree bend in the drilling to exit in the air intake, that little 5mm hole at the bottom of the intake. To ensure the jet is properly aligned with this the centre brass section is secured with a small steel screw. THIS MUST LOCATE INTO SQUARE RECESS IN TOP OF CENTRAL BRASS JET. Check by removing top ring and air slide, you can se screw in recess. Too many are taken apart and put back with screw in little neat round hole... blocking jet nicely!
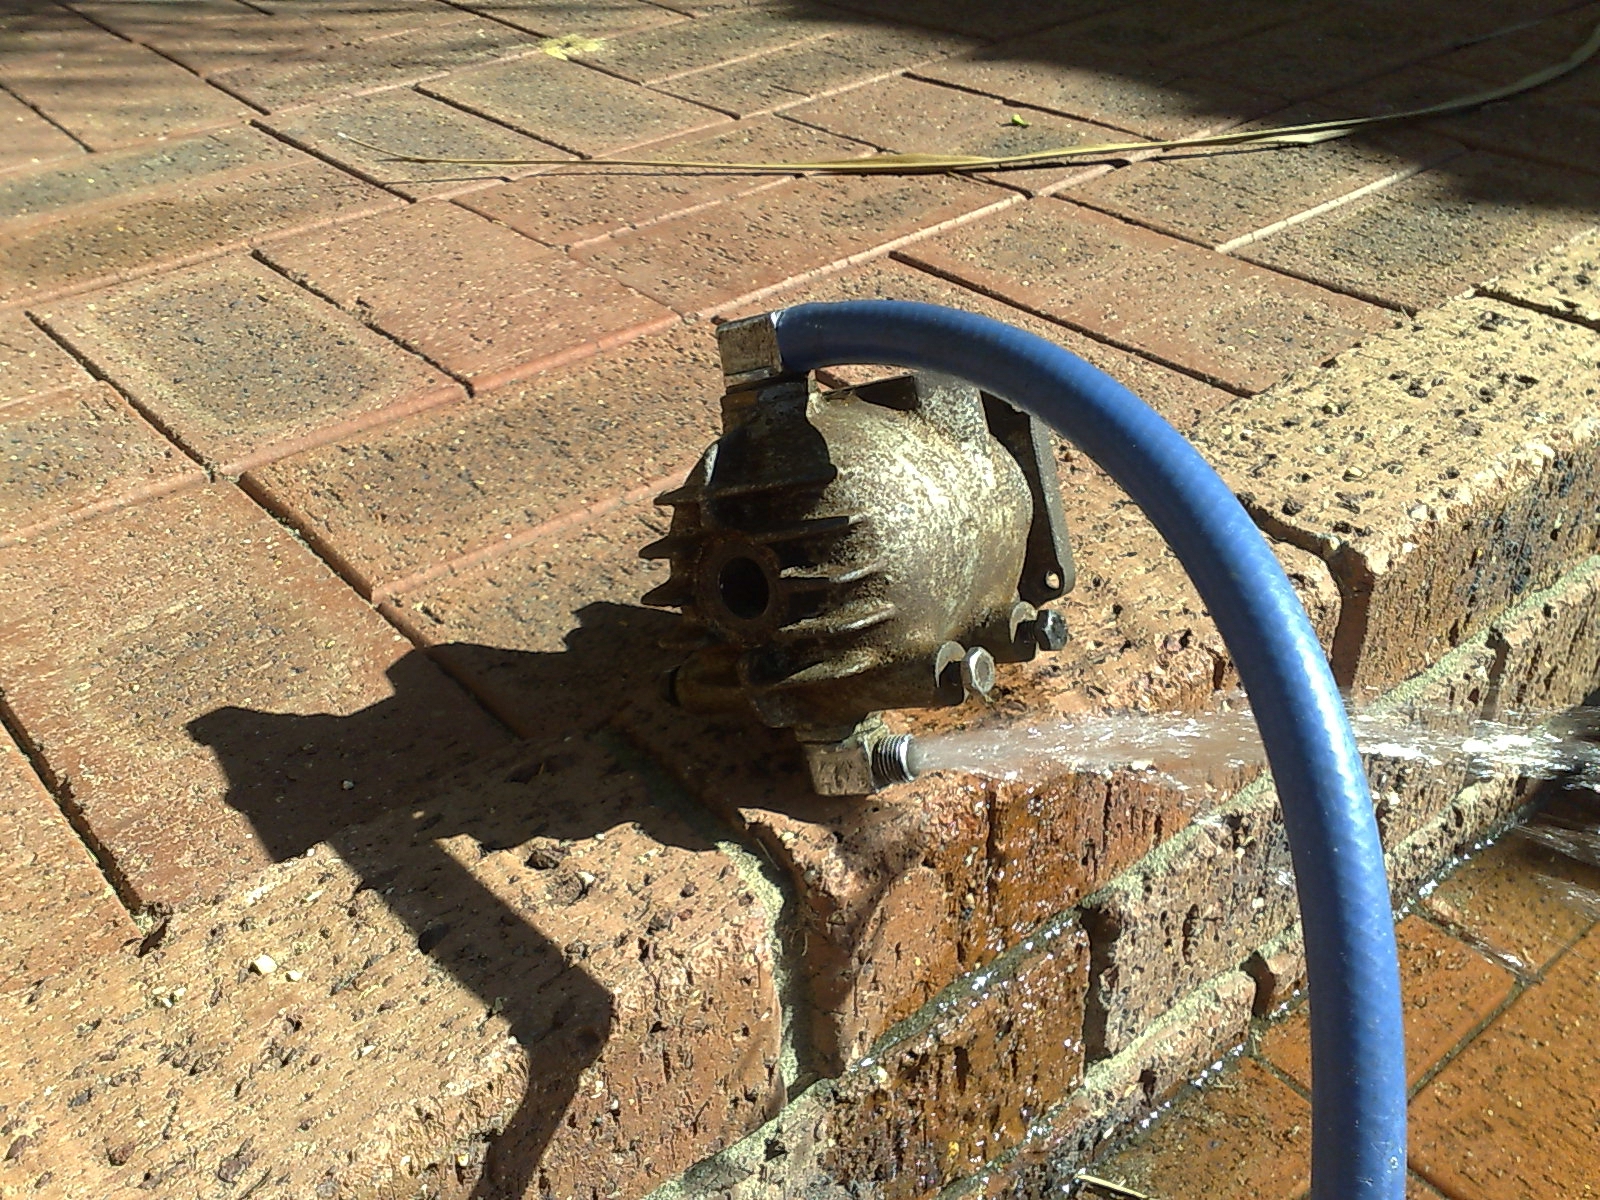
I think my water pump has packed up, can I buy a new impellor?
Over the years I think I have only had half a dozen pump failures. Most fail because they are taken apart.!! The ‘British Seagull’ pump is a robust little thing. A hard rotor, (not an impellor), rotates in a housing, it does not touch the sides and works like the pump in a washing machine, by centrifugal force. It spins the water, the water finds the outlet slot and is forced up it. It should really be called a 'rotor' not an impellor, but everyone knows what you mean by impellor!
If your seagull has stopped pumping it is far more likely that the cylinder block or pipe work is blocked.
However be warned, the pump will not circulate water at tick-over, so if you shut the throttle too far, the motor will overheat! Blip the throttle every minute to keep her cool or set the throttle so water just circulates....
 This is what water circulation in a tub should look like, with direct drive you
may have to remove the drive spring to allow the prop to free wheel... Thanks to
Diane and Mark for this one.
This is what water circulation in a tub should look like, with direct drive you
may have to remove the drive spring to allow the prop to free wheel... Thanks to
Diane and Mark for this one.
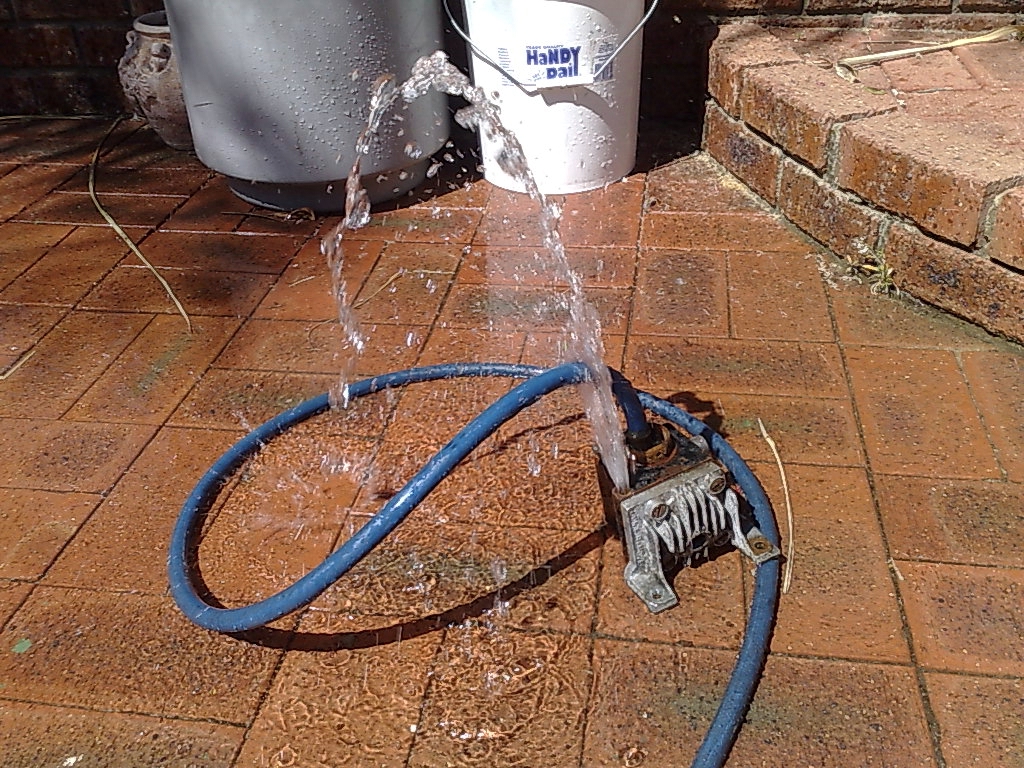
 Here is a 102 belonging to Mark Wiggs, showing not only the flow, but a nice
102!
Here is a 102 belonging to Mark Wiggs, showing not only the flow, but a nice
102!
First Aid. (Warning, you will get wet doing this!!) Take a normal garden hose and place it over the outlet hole on the head, force water back and out the gearbox slots/holes. Nine times out of ten this works, if it is a sudden blockage. Additional tip, find a plastic mastic gun nozzle, fit the hose end into the back and insert nozzle into outlet, you get slightly less wet this way!

 These 3 pics in from Bruce in Oz showing blocks being flushed!
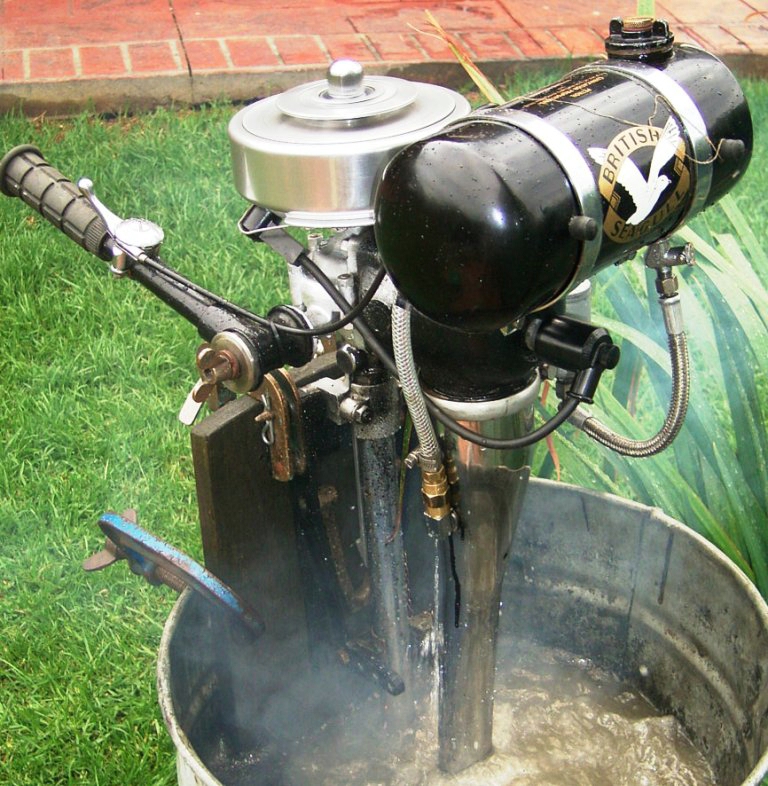 Marston in the tub! Rob in Oz with what looks like a Marston, or is it a
modified 102?
Marston in the tub! Rob in Oz with what looks like a Marston, or is it a
modified 102?
I have tried hot kettle and iron de-scaler with some success at this stage, but be careful, it is corrosive. The way I do this to invert the engine and clamp the drive leg in the side of a workmate so it is stable. Rest it on a plank of wood or similar. Then I take a very small funnel and pour hot kettle de-scaler into the outlet hole on the block till I can get no more in, and leave it for 24 hours. I carefully turn the motor back over, draining the liquid out as I do, then try back flushing again. If it shifts some muck, try it again. After a few tries I normally get quite an improvement. The salts deposited have been dissolved.
If it is still blocked then it sadly calls for a strip down, starting with buying the manual, to save you making simple, but expensive mistakes. The last resort is to remove the bit that tells you ‘Don’t remove’!! The head. Why does it say that? Well those nice little steel bolts that hold the Ali head on go right into the water jacket, so the ends of the threads are rusted and corroded solid! What inevitably happens is the bolts shear off, even if you use lots of heat on them. They are made from a secret recipe, Dorset cheese steel! OK the head is off, but now you have to find someone who can drill out those bolts without damaging the threads, (5/16 BSF) good luck! At least you will now be able to see why you have no water circulation. The blocks ample waterways are probably blocked with years of mud, sand, silt, salt all baked to the consistency of cast iron…. Chip away, it is the only real way to do it.
 Thanks to David Rolston for this pic. This is what it should look like!
Repainted, with new gaskets, it will go on for a few years yet. But now you will flush it in fresh water more often won’t you.

I have problems getting water to circulate when I test in the tub.
If your motor has a clutch, use it. If not, remove the drive spring so the prop will not drive. The water flow in the pump can easily be upset by the prop wash. WARNING. Do not over rev the engine, as there will be no load.
My ‘British Seagull’ starts up Ok at home in the tub, but not on the boat?
Answer, Hydrophobia.!!
No not really. Bet you have the leg too far into the water. The correct level is just an inch or two up the exhaust leg. (Measured on the straight tube, 2" max, from the bottom lip of it.) If too deeply immersed the gasses have difficulty in escaping as you pull, there are two little holes in the exhaust to help, (on most models), but if the water comes half way up, as it probably will when you go to the stern to start it, then you have problems. Shift weight forward in the boat, be delicate here if it’s your other half!
There is a collar to lift the smaller 40 series engines up slightly: that might help. I have known some start the motor out of the water, and then lower the bracket…. Bit extreme, but if it works. (and you can stand the noise!)
What are the holes for, in the exhaust and also in the chrome drive leg?
The two holes at the back of the exhaust are to help limit back pressure when you start the motor. Of course if you mount the motor too deeply they cannot cope and you will still have a problem, so make sure the bottom of the straight exhaust pipe is only about 1 or 2 inches beneath the water. Of course British Seagull Fans will know the real reason for these holes is to allow your British Seagull to bark! A distinctive note I hope to hear in the creeks and rivers locally, for many years!
The 4 holes in the chromed pipe are to allow water to drain when the motor is lifted clear of the water. They let air in so water escapes at the lower end. Sometimes water will escape from the lower ones if the water from the pump cannot easily get up into the block... a partial blockage... back flush the system and ensure a good flow from the outlet under the head, if that is OK and it still squirts out, never mind!
My British Seagull runs for 15 minutes then loses power, slowing to a stop. It is not seized.
Sadly this is classic sign of the leaking head gasket, so the head is going to have to come off. I know, it says 'Do not Remove' Yes, it is for a reason, you do not have to de-coke, as we once did with two-strokes, and these screws actually go into the water-jacket, so they can be more than stubborn to remove. A gas blow lamp helps, plus some WD40. They are 5/16 BSF if you need to clean up the threads later..... I now have new S/S head bolts! £2.50 each, same price as rusty ones!
When you have the head off, check there are no faint black marks in the bore... This could be the only sign you might get that the block has cracked, giving the same symptoms. Normally the outside of the block will have gone as well, time to find a new block.... Yes I do have them, for the Forty and the silver Century, but at a price!
Assuming the block is OK, refit with a new head gasket, they are cheap enough, with heat proof silicone sealant, sold in car accessory shops as 'Instant Gasket' or 'No Gasket', orange or black in colour. British Seagull recommended it, as the head and block joints are often not smooth. Tighten bolts finger tight only, leave for 4 hours before finally tightening to 18ft lb, a good hand spanner tightness!
Why does my carb leak when I tilt the motor on arrival at the shore?
'Cos there's a little hole in the float chamber..... (Villiers or Amal 2 Jet)
You will get used to gauging how far you can go on a carb full. Turn off the engine fuel tap and tank air vent, on your approach, then be ready to row a yard or two.
It will leak out if you have any left in the carb bowl. Lay the motor down before you put it in the car, to ensure you do not get gassed…
Motors been laid up for a while in my shed and now it won’t fire up.
Could be old fuel, see above. Some times I have found that the points, (on points models!), seem to get a coating on them. It may be damp and salt, with the flywheel stopping in the right, or wrong! place, the points may have been open. Take off the flywheel nut. Normal right hand thread. Use a ring spanner or socket, (BSF/Whit sizes), given a sharp tap with a soft-faced hammer will free it. Remove the rope pulley and expose the points. They are in the little round, brass lidded box on the Villiers ignitions. Clean the points with fine emery paper and then a ‘cotton bud’ and meths. Set the gap to 20 thou, that's 0.5 mm.
Test by simply holding the spark plug, (also set to 20 thou) against the block with a pair of insulated pliers; spin the flywheel with the flat of your hand. You should get a bluish spark.
New fuel and you will be away, don’t forget the gearbox…
How best to clean the bronze bracket parts of my British Seagull?
I am indebted to Douglas for this information, He bought caustic Soda from his local Hardware shop, for just £3.00 diluted it and cleaned the bracket parts in a bucket of solution, then left them overnight and hey Presto, like new!
Caution, Douglas said he wore goggles and gloves to clean with a small brush. Very wise!
What puller do I use to get the flywheel off?
NO, NO, NO. Never be tempted. In the manual it states that it is the only job that you need two pairs of hands for. There is a very clear and simple way to get the flywheel off, buy the manual; it may save your motor. Every year I have at least three who have tried to pull them off, with pullers and ended up with bits. As Wipac ignition flywheels are no longer available, I depend on sourcing old ones to meet the demand; they are in very short supply.


Here is the page from the manual Seagull allowed me to publish as they were rapidly running out of Wipac flywheels!
OK. The very late British Seagull Kingfishers etc, did advise the use of a puller, be very careful to get the motor to bdc before you remove it, especially if you need to tap the puller! Their flywheels were different.
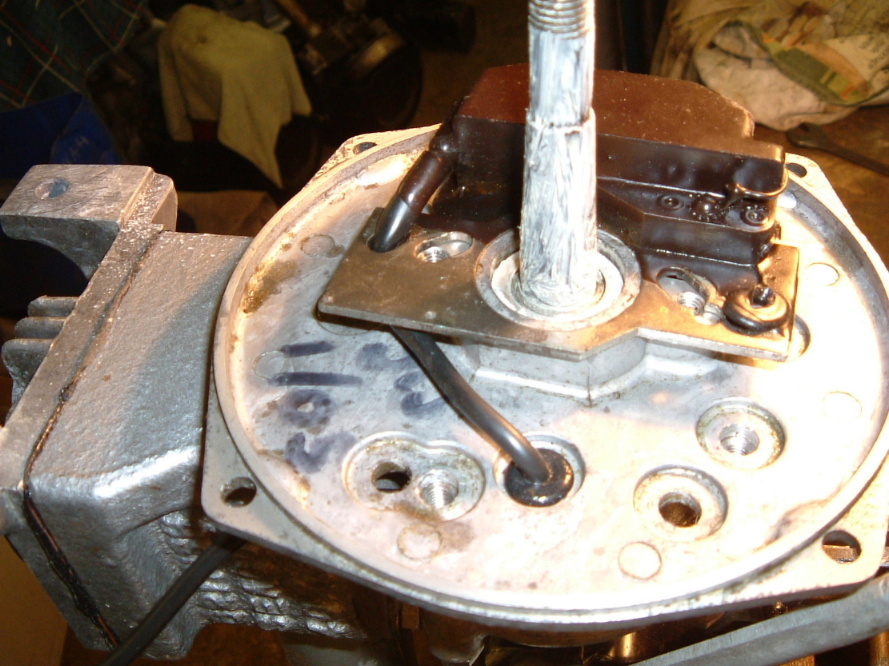
How do I change the timing?
You don’t, it’s fixed. The small screw under the ignition back plate locates in a dimple in the upper crankcase, that’s it.
The points setting printed on my engine is less than 20 thou, why?
Years ago, with different fuels that was the setting. Now all points are set to 20. It is to do with the fuel we use now. We needed to change the ignition timing slightly see bills note below.
I have had more on the reasons for different gaps from Bill Crossley, Thanks Bill.
As an old and retired navy engineer I have some experience in tuning combustion engines. In a fixed point ignition system, like a seagull motor, the only way to retard or advance the spark is by varying the points gap. You will find points in different makes of engines set at varying gaps from 10 to 30 thou, there is no perfect gap it is mostly a function of engine speed and the designer picking an easy setting to remember. The gap is set by engine design to occur at an exact point before top dead centre (TDC) to give max power in that particular engine. Opening the points gap will advance the timing and reducing the gap will retard the spark. Both will reduce engine power and in some cases produce unwanted and noisy side effects. In an old motor, with below design compression, (through wear), a slight improvement in power might be obtained by advancing the ignition (because the charge is burning more slowly) and reaches max pressure just after TDC., the optimum point. i.e., open the points slightly. Without proper test gear this would be a hit and miss method and I wouldn't recommend it. However having said that, some fiddling with points gap could be done to see if the motor runs better and cures a problem which must be there before going down this track. It is important to check the wear and perfection of the long cam follower and set the points as dictated by your engine designer. An error of 1 or 2 thou makes a big difference in flywheel rotation and the instant of spark occurring, with a loss of engine power. Yours aye Bill Crossley.
Should the setting on my plug be 25 thou, as it says in my hand book?
Only for the later, (1994 on) ignitions the Wipac Mk IV.
Certain motors with late model, Mk IV Wipac sealed C.D. ignitions, have a plug setting of 25 thou, this includes all the Q.B. seagulls, and most models from 1987.
 This is a pic of a Wipac Mk IV. The coil should be fitted to the stbd side of the backplate, with the ign lead end of the coil forward, the cut out lead aft. Note not all models used the cut out lead,
red wire, some simply had it hanging, sealed off.
This is a pic of a Wipac Mk IV. The coil should be fitted to the stbd side of the backplate, with the ign lead end of the coil forward, the cut out lead aft. Note not all models used the cut out lead,
red wire, some simply had it hanging, sealed off.
Earlier C.D. ignitions, from 1980, the MkIII Wipac’s used a wider, 35 thou setting.
This is a MkIII Wipac CD ign. Thanks to Joe Hanley for the pic.
I am getting a spark, but only a very weak one, should I replace the coil? Common fault with early villiers ignitions. (Wipac uses different magnets and I have not found one that has lost magnetism as yet.)
No, but here is a trick I learnt years ago and thought I had mentioned on these pages already, but no.
NOTE, FOR Villiers POINTS IGN ONLY.
If the spark is weak, it could be that the magnetism in the flywheel is low. You can get flywheels 're-magnetised', at a cost, if you can find someone who has the kit. But first try this:
Spin the engine up with an electric drill! First remove the plug, then fit a socket to the flywheel nut and a drill to a socket set extension. I use a rechargeable electric drill, but any will do. (reduce the friction, squirt a little oil into the bore and carb, to lubricate the motor.)
Spin the motor up, I recon I get to 1500 revs on my drill, maybe a bit less with all the friction, but do that for 5 minutes. Then reconnect plug and lead and look at the spark.... As if by magic it will have increased.
The physicist out there will tell me how, something do with EMF I am sure, all I know is, it works? Try it and see.
Below is the answer! I'm indebted to Fred Holmwood for troubling to tell me why it works, thanks Fred.
The re-magnetising works thus:
The principle of a magneto is that you have two closely wound coils, the primary (low voltage) and the secondary (high voltage)
The flywheel spinning round passes magnets close to the coil core (soft iron) and induces a small voltage, I don't know what in the case of a British Seagull but probably around six volts, this voltage causes current to flow through the contacts to earth and back into the other end of the primary coil. This creates a magnetic field around the coil.
On the contacts opening the current ceases and the magnetic field, caused by the current, collapses.
This collapsing field induces a voltage in the secondary coil which is in the order of several thousands of volts, you have a spark!
When the flywheel magnets become weak through lack of use or knocks you are unable to pull the cord fast enough to produce a voltage in the primary.
If you then apply a drive which is faster rotation the weak residual magnetism induces a weak voltage which in turn induces a small magnetic field the combination of residual and induced produces a larger voltage which induces a larger voltage which in turn induces a slightly larger magnetic field the combination of residual and induced, slightly larger, produces a larger voltage and so on until the unit is running at saturation level, you can now produce a spark!!
Having said that the first move must be to clean the contacts in order to allow the first very weak current to flow without undue resistance!
If you ever come across one that does not respond it probably means that the flywheel magnets are totally devoid of any magnetic field, this could be rectified by passing a small external current through the primary winding, but this isn't as simple as it sounds as you need to know what current to apply and each magnet in the flywheel needs stimulating!
In practice a lantern battery from earth to the coil side of the contact breaker, points open, for a second or two only would probably induce sufficient to get you going again.
Hope I have kept it understandable!!
Regards
Fred Holmwood
Yes this trick does work, here is a letter from a happy British Seaguller to underline it.....
Hi, My name is John Russouw I live in Cape Town, South Africa. My dad recently got his hands on a old seagull (engine no THC 347 L5). I am not sure, but according to your charts it should be a 102 Plus long shaft model, but I stand corrected. We got the engine from a fisherman in Betty's Bay. He told us that he got the engine from another guy and that it hasn't ran in years, but if we got it going we could have it for a R1000. So we took it home and spent hours trying to get the thing to start. We cleaned her up drained the fuel tank cleaned the carburetor out, replaced the spark plug, still nothing. Then we realized that there was no spark. So we automatically assumed that the coil or the condenser had packed up. So we decided to replace the coil and condenser, but before we done that, I suggested we surf the net to get some advice. That's when I stumbled on to your website and thank goodness I did. I read the article about recharging the coil, by spinning the engine with a drill. We had nothing to loose so we tried it. I ran the drill for about 4 mins. We were astonished when the old seagull sprung to life after only one pull of the cord. Me and my dad were so happy we ran to the bar fridge to open up a cold beer to celebrate our success. I'd just like to commend you on a excellent web site. Thanks to your information our seagull is purring like a kitten again
Another British Seagull flies again!
There is a school of though that the points are also cleaned by the arcing that goes on when you do this and this may have something to do with the good results.
Another trick is to use a very strong magnet, like the 'Sea Searcher' sort sometimes carried on boats, stick it to the side of the flywheel for a few hours and see if it improves the magnetism...
I have no spark at all, is my coil dead, how do I test it?
To test the Villiers and the Wipac points Magnetos, all you need is a simple multi-meter set on Ohms x 1000, or 1K. Note. not for later CDi ignitions with no points to adjust!
DO NOT TRY THIS ON A LATER POINTS FREE CDi UNIT.!! You will damage it.
Put one probe on the HT outlet of the coil, where the HT lead connects and the other anywhere on the Ali backing plate. We are looking for a reading of between 3 K and 5 K Ohms. If you have a reading the coil is OK. No reading, duff. I do have S/H Wipac coils, but Villiers ones are in short supply. See the links page, down the bottom of the page there is a link to a Villiers service man, George, who will rebuild them. Or of course you could buy an old stock new one at £103.50, last I looked...... I will not sell these as one has failed in storage, just age.
Only problem is getting the old coil off the soft iron magnets, 30 years of salt air will have taken it's toll.
There is an alternative, swop the lot for a later Wipac, backplate, coil and flywheel will be needed. Got them in stock.
One trick you could try before ditching the old coil, remove backplate and place it with coil attached in the airing cupboard for a week. This just might dry out any moisture inside. If it does re-varnish it to seal it! The oven was also suggested, on a low setting, but you might have trouble enough at home without upsetting the other half with a smelly, oily bit of British Seagull in her oven!
Another tip was to re-solder the HT pip on the Villiers, in case the joint had gone dry just inside? Anyone had any luck with this one?
These days better to replace all with new parts, see the links page for George at www. villiersparts.co.uk, he can refurbish a villiers back plate to new for £100 approx (2019 prices).
Everything is set OK, it is a points ign motor, but I still get odd misfires?
Now don't ask me how this works, I just know it does. Try opening the plug gap to 25 thou. It sometimes does the trick?? Anyone like to explain what is going on here?
Bill Crossley has sent in an explanation, thanks Bill.
The high voltage at the spark plug is not an instantaneous event, but 'builds up' from the moment the points open, due to the collapsing magnetic field in the primary coil iron core. At some point on this rising secondary voltage curve, it will overcome the resistance of the plug gap -and the suppression caused by cylinder compression- and arc across the plug gap [we hope]. By increasing the plug gap and \ or by increasing the cylinder pressure, we delay the point of plug firing and as this is a time delay it relates directly to crankshaft rotation and retards the ignition. What is in fact happening inside the compression space is a slightly retarded but much more aggressive spark [higher voltage] Bill.
So it retards it as well, clever!
The cup washer has fallen off my clamp bracket screw, and though I have a new cup washer from you, cheap, there is little left to fix it too!
Common problem. The bronze screws work harden and bits drop off. The best way is to file off some threads to make a new blank length you can push through the new cup washer, not too long, you must to be able to peen over a little of the protruding screw, to hold the washer on. You can either use a small hammer or a cold chisel and hammer and put a X in the end or grip the ball end of a hammer against it in the vice. Whichever method you use it helps to heat the end up, with a blow lamp to soften it first.
Note from Brian Corrie, heat the end to dull red, then quench with water, otherwise it will become brittle and break! Thanks Brian.
You can drill and tap a thread into the end of the thumbscrews, then fit the washer that way, with a small screw, but often the screws get damaged.
Do you have better Stainless thumbscrews?
Yes! and slightly cheaper too! they are £16.50 as opposed to the Bronze ones at £18.50. Far better made with the Stainless cup washer secured with a countersunk stainless screw. Highly recommended. Look exactly the same as the older chromed ones! See the 'For Sale' page
Are there stainless nuts and bolts etc available?
Yes. At SOS I have now almost every stud and screw, bolt and washer in stainless. British Seagull had started to do this just before they packed up, so I have taken the initiative to have them manufactured. Strangely enough the cost of the stainless bolts etc. is the same as the mild steel ones! See the 'For Sale' page.
There is even my new stainless steel SOS Multispanner. See the 'For Sale' page.
Why should the gear change on my FNR model keep jamming?
The selector rod for the gears on all the FNR models, runs as a stainless steel shaft through an aluminium casting, with very little clearance. If the outboard is either left for long periods immersed, or used for long periods, when of course it is immersed, it can corrode up. Liberal use of WD40 helps. If you cannot move it at all, hang it upright on a wooden plank in a vice, make a small ‘dam’ with ‘blue tack’ or plastacine, fill it with WD40 and wait. Eventually you will free it off. Keep it out of the water if you can, when not in use! Lubricate often.
Can I fit a recoil start to my ‘British Seagull’?
On later models, fitted with Wipac points ignition, ‘British Seagull’ made a dome cover to fit over the flywheel with a recoil starter on top, sadly they are very expensive.(£95 in 2002) Discontinued in 2004.
On early models ‘Siba’ made a recoil start that mounted on a tube framework, bolted onto the crankcase bolts.
These work well till they either the tubes rust or get a knock that slightly bends them. Then the mechanism can foul.
On all electronic ignition ‘British Seagull’ there was the option of a starter. These are sadly no longer available new, only S/H.
My engine number does not appear to be correct for what my engine is?
Sadly this is often the case. ‘British Seagull’ had what they called ’Star interchangeability’. What it meant in reality was parts were common to several engines and could be swapped. This saved ‘British Seagull’ production cost, very clever. Over the years this has been taken to extremes, with long shafts on standard and vice versa, clutches on direct drive, and vice versa and even blocks and carbs, props and brackets swapped from different models. For this reason I tend to ask for engine numbers, then ask a few more questions, in case the motor in question has been ‘got at’! I have seen some unscrupulous dealers make up all sorts of ‘Bitsas’!!
My fuel tank is badly dented, how can I repair it?
This is a real problem with the brass tanks. The steel ones do not normally have this problem, you will have thrown them away long before as they have reduced to a leaking rusty mess! There is little you can do with a steel tank, except, stop it rusting by painting it and keeping it full of fuel to prevent condensation inside. We did some success with 'Petseal', but this is no longer good enough for modern fuel because of the Ethanol content of fuel. So today whatever sealer has to be an epoxy based one. 'Super Seal' is one brand name. This is an interior coating mostly used by motorcycle restorers for their steel tanks. Coats the interior with resin.
Back to the brass tanks. Dents. The danger of explosion is a very real one with an empty tank, so I would caution against the use of naked flame! Yes I have heard it done, but I have also attended scenes of explosions where clean, empty tanks have killed, BEWARE.
There is a method of ramming the tank full of sand, then heating it, applying further ramming pressure, to force dents out. I have also heard there is a company in the USA that specialises in dent removal by hydraulic means, but know no more.
The most successful, though perhaps laborious is the method shown in the photos here, sent in by Bob He neatly cuts of the ends of the tank, then can remove all the dents and ensure the tank is super clean, before making up a butt strap of brass, inserting it at each end and soldering the lot back together. I think you will agree the finished product looks great. Sadly he has no 'before' pics.
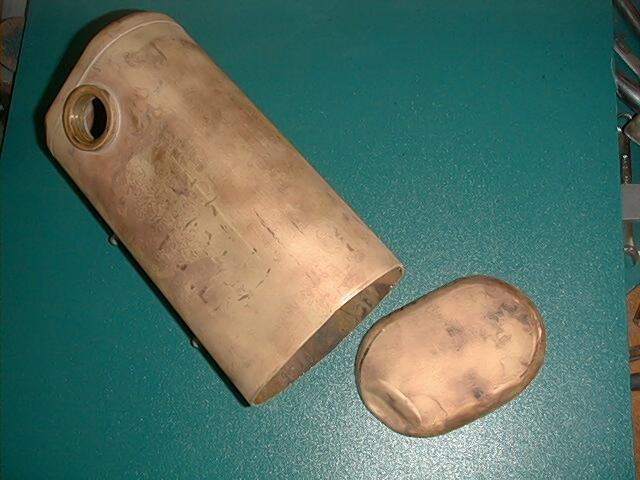
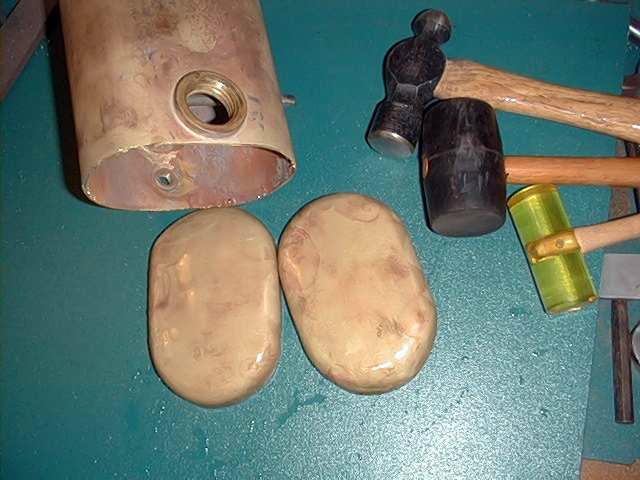


As you can see Bob has made good with filler after his soldering, but before testing to see if it held fuel! What the pictures do not show is the strip of brass soldered into the tank to mount the ends on, but I'm sure you get the idea. Well done Bob.
I was given another method, that was to fill the tank with water, then freeze it? I tried, it did push some dents out, but it bowed the tank quite a lot too, had to squeeze it between two planks to make the top and bottom flat again... so it is an alternative, but maybe not the total safe answer. It will also not take sharp creases out...
How does one 'Winterise' a motor?
At the end of the season, to save a lot of hassle the next time you want to use your motor it is worth doing a little work.
First find a freshwater tub and run the engine for 30 minutes in it. That will flush out any salt residue. Allow to stand to drain for an hour.
Run the fuel right out, whilst running in tank, drain tank ( use old fuel in a car? not if it has a catalyst on the exhaust though!) and drain float bowl if it is easy to do, not so with the Amal 2 jet perhaps, with that one you can drain the bowl by removing the fuel line from the tap, then pivoting it so the tap end comes lower than the carb....
Remove tap plunger and place in small poly bag with a little oil, tie to fuel line. No dried up cork nor sludge in tank next year.
Then wash the motor down, removing salt from the outside. If you varnished the motor from new.... That's all it might need, unless some varnish needs renewing. Otherwise rub down with an oily rag, spray with WD40.
Drain the oil out of the gearbox, overnight in a warm workshop, or heat the gearbox gently to make it flow. Replace with 140 or in the case of motors with intact oil seals, 90 grade. See above.
Remove spark plug and squirt a little oil in bore, turn motor over without plug slowly, replace plug, do not tighten. ( Oil will dribble down inside of exhaust, so do not forget that cut down poly bottle for drips.) Leave HT lead off to remind you in the Spring!
Store up right in corner of lounge, near best chair and radiator, stroking gently on occasions when sky very overcast and grey....OOpps, maybe store upright lashed to wall of dry and preferably warmish shed or garage. Do ensure it cannot fall over. Place drip pan under gearbox as it will leak slightly...
The engine goes OK but the prop does not drive the boat, except at snails pace?
Check the Drive Spring. The end of the spring should protrude out of the side of the prop with a 90 degree bend on the end. If you cannot see the end, it will be wrapped inside the prop, the motor will now only drive a tick over, as the end of the spring is possibly lightly jammed against the inside of the boss. It will cut a groove in the Ali prop and often this is seen. Replace the prop spring and all will be well again, don't worry about the groove worn in the prop!

This is the page from the workshop manual with the distortion tolerances shown. These drive springs are so cheap, £4.27 each in 2017, you should always have a spare. Without one the motor could be useless! I recommend tying a spare to the tiller arm, I use an electrical tie!
I want to make my British Seagull look as good as new, but the transfer lets it down, any chance of any Decals?
Yes! See my 'For Sale' page I have found transfers as per the originals, and reasonably priced at £10.00 a time.
Now got the Flying Seagull ones for the model 102 as well!
There used to be covers available, are they still?
As there were no British Seagull covers available for years I have had SOS covers made. they are waterproof and have my logo on them. £19.50 a time. See the 'For Sale' page for more.
Beware non standard rope pulls!
I had the following mail in recently, May 08, and it reminded me I should put a note on here.....
hi John, my Forty Plus is now up and running well after your help some time ago. However, I have had an accident with the pull cord handle, my home made wooden one, yes you've guessed it, the cord jammed and before I had time to move my arm I had been whipped a few times, making a right mess of my arm before the wood shattered. This was only a small handle. I now have a proper one. but I keep seeing on eBay some cords with large lumps of wood as handles which, if they had my misfortune, may strip flesh to the bone. So I was wondering if there might be a warning added to your great site, so others can learn from mistakes like mine . Cheers from Stuart Curran
Stuart, I have also been guilty at time of improvising rope pulls.. I have got away with it, but I have heard of others who have not. The cord should not be too long, 3 turns max, nor too thick, so it easily pulls out... The British Seagull plastic Tee handle or half round plastic ends are safest... £4.00 from me. (Was a lawn mower that got me, with a proper recoil on it....)
How do I clean the bronze and brass parts without damaging them?
Try this tip in from Finland.
I have a good chemical tip to clean brass parts.
It is cheap and old Finnish generations have used it for ages.
First the oil and grease should be taken off by washing it for example Fairy, petrol or lamp oil.
Then you need a normal vinegar and normal salt.
Put the salt to the vinegar so much as is possible.
Let the parts be soaked in vinegar over night.
Then wash the parts with warm water.
When dried, wax them with normal auto wax.
Maybe this tip is already known, but I tell it anyway.
Best regards Pekka, Finland
Harry's jig for drilling out head bolts!


Harry's jig for drilling out head bolts!
Lastly, are there manuals available?
Yes, there is a manual that covers all the square block models and a bit on the 102 as well. There is also one for the Q.B. range. Ring me for prices.
Beware of the pirated editions on CDs or promises to 'download' you one... they are pirated editions and several people have commented that they are poor quality and some have not even got their downloads! Be warned.

Leaflet sent in by Dave Barker.