Page 2 of 2
Re: Changing ht lead on 102
Posted: Thu Aug 02, 2012 11:38 pm
by pat777
skyetoyman wrote:modified screw to connect is similar to how some plug caps are fitted - so should work fine.
Will be ok for up and down the LiffEy
Yes unless somebody can come up with a better way of connecting the two leads I'd say I'll stick with the screw method. It looks like it will work judging by the youtube clip. I'm hoping the connection will suffice as a permanent fix but sure only time will tell.
Cheers Pat
Re: Changing ht lead on 102
Posted: Thu Aug 02, 2012 11:48 pm
by pat777
+1
I would try and do this too so all your joints are protected.
Try a place that does specialist car parts. We have a place here that does rare spares and the like and they have facilities for making up leads including wire cored stuff with crimp connectors, may even have joiners. They made both my Century leads for $10 including nice rubber plug caps that seal on the plug porcelain.
The heat shrink with the glue is also a lot thicker than the garden variety. Couple of layers and you probably have close to original insulation thickness.
That sounds like a bargain $10 for two leads. I remain hopeful that I'll be able to get some ht lead for the job in the local motor factors. It's definitely available on ebay if all other routes fail.
Cheers Pat
Re: Changing ht lead on 102
Posted: Thu Aug 02, 2012 11:51 pm
by pat777
This post got lost on page one when page two opened up.
pat777 wrote:Charles uk wrote:It would appear from your pictures that the insulation on your HT lead is in a very poor state, why not look at a repair above the baseplate where the insulation is more protected & should be in better condition, then all you need to find is the right sized copper cored HT lead & some method of connecting them, the joint will then be better protected from vibration as it will be supported quite closely at both ends.
The insulation is very bad at the end all right, there is no noticeable damage after the first few inches. I agree it would be better to have the connection above the base plate under the flywheel for both the support and the weather protection but I think it might be a bit of a fiddly job trying to get the connection right in the confines of the flywheel. (I'd be worried about straining the joint when it comes to pulling the lead back through the grommet on the base plate. You'd only really get one chance to get it right also where as if I keep it below the base plate if the first attempt doesn't work I can just cut another bit off the existing lead.
I'm hoping with the adhesive lined heat shrink that I will have a fairly secure joint that will be protected from the elements and the vibration. Thanks for putting forward the idea though, it's good to consider different options when it comes to these bodge jobs.
This sort of repair should be ok for frendly river use but might not be quite as suitable for crossing the Irish sea!
That sounds like a challenge to me! I'm not sure the RNLI would be too happy with me heading off across the channel with my "trusty seagull". If I leave now I may make it in time for the Essex Flocking. I think I'll stick to the safe option cruising up and down the canals.
John might have the right sized HT lead have you tried him?
John must have Charles uk on commission for all of these referrals! I'll try and get some lead locally but if I have no luck I'll get in touch all right. I know I haven't got a hope of getting the 4mm locally but I'm hoping one of the local motor factors will have some 5mm that will hopefully do the (bodge) job
Cheers Pat
Re: Changing ht lead on 102
Posted: Fri Aug 03, 2012 8:23 am
by RickUK
Try a lawnmower repair shop for the smaller diameter HT lead
Re: Changing ht lead on 102
Posted: Fri Aug 03, 2012 8:38 am
by Charles uk
No commission I'm afraid, but as he pays all the costs on this website himself, it's the least I can do as a thankyou!
Re: Changing ht lead on 102
Posted: Sat Aug 04, 2012 12:31 am
by pat777
RickUK wrote:Try a lawnmower repair shop for the smaller diameter HT lead
Thanks, that makes sense alright! I tried a few of the local motor factors today and they looked at me like I had two heads. Good to hear you're not on commission Charles uk and just doing it out of the kindness of your heart. I couldn't agree more, that it's a great service that John provides for all us Seagullers.
Cheers Pat
Re: Changing ht lead on 102
Posted: Sat Aug 04, 2012 2:23 pm
by Keith.P
If you have no luck. I have some 4mm.
Re: Changing ht lead on 102
Posted: Sat Aug 04, 2012 5:59 pm
by pat777
Thanks Keith.P, I'll keep you in mind if I have no luck locally. Did you buy that on the web or where? A search for "4mm ht lead" on ebay shows no results. I'm so jealous, you must have a good twenty metres of the stuff there! You must have a lot of seagulls to be buying that kind of quantity of ht lead. It's handy stuff to have around the garage I suppose. I did buy one of the seagull ht leads with the connector on the end as supplied by John at sos a few months ago and the insulation is a lot thicker than 4mm,obviously it's not suitable for my situation. I'll be able to use it one of my other gulls if they ever need replacing, handy to have as a spare.
http://saving-old-seagulls.co.uk/buy_sp ... %20cap.jpg
Thanks very much for thinking of me,
Cheers Pat
Re: Changing ht lead on 102
Posted: Sat Aug 04, 2012 8:10 pm
by Keith.P
Come on its not the length that counts its what you do with it.
Old stock from my plant hire servicing days, shout if you need some.
Re: Changing ht lead on 102
Posted: Sun Aug 19, 2012 1:34 am
by pat777
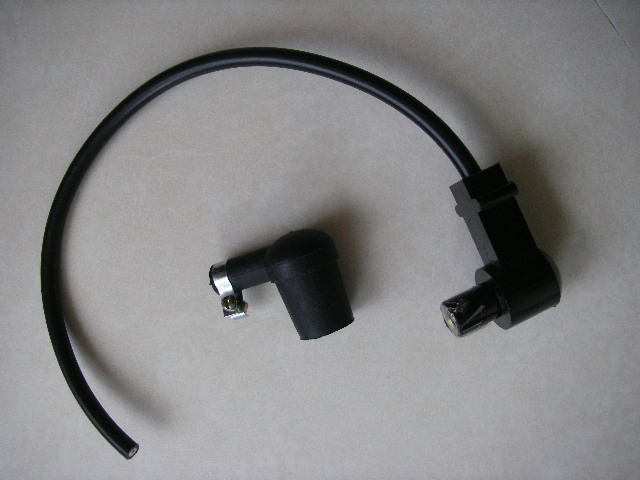
So I managed to get hold of some 5mm ht lead at last, in one of the local motor factors (the last one I tried of course!). I cut the old 4mm ht lead and stripped back the insulation about an inch and flared out the 8 strands of copper cable. Luckily the copper cable on the 5mm appears to be the exact same size; it has also got 8 strands so I flared the cable and interlinked them together and twisted the strands together and then soldered them together. (I had a crocodile clip on either end of the copper stranded cable to stop the insulation melting when I was soldering the cables together.)
I had no luck getting the adhesive lined heat shrink locally, so I got some on ebay, I went for 9mm heat shrink, which has a 3:1 shrink rate so it will shrink down to 3mm. I put on two layers of the stuff, second layer longer than the first. The adhesive lined heat shrink worked well and I am left with what appears to be a very secure joint, I guess only time will tell. (Thanks to Taspiper for the suggestion on the heat shrink) I also managed to pick up a nice new champion plug cap in a lawnmower repair shop. It's all back together now and of course it started first pull and ran smoothly (well relatively smoothly), I still need to do some tinkering.
Thanks for all the suggestions and help.
Cheers Pat


