
I removed the flywheel (Using the hold and tap method - came off really easily) and magneto base plate earlier, George at Villiers parts assures me that the coil will be no good, but he can supply a replacement coil, points and points cover. I'm debating whether to send the whole lot to him or do it myself.
The magneto has the serial number JM2962 stamped on the baseplate.
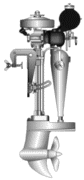
SD restoration
Moderators: John@sos, RickUK, charlesp, Charles uk
Re: SD restoration
- Attachments
-

Re: SD restoration
Why not replace the points box from your other 102 and change the pivot arm? Also run some water through the block to see if the water jacket is clear. You can test the coil with a meter. Lots of threads here on that... 
Re: SD restoration
Yes I will do that, was only thinking about what to do next earlier. If it sparks ok with new points all is good, if not then the coil will most likely need looking at. Once I'm happy with the mag I'll investigte the block a little some more.

Re: SD restoration
Hi Hugo,
Need some time to make a list of the surplus SD parts I have. It's not a Winter job in an unheated shed.
As soon the list is finished I will PM you.
Jan
Need some time to make a list of the surplus SD parts I have. It's not a Winter job in an unheated shed.
As soon the list is finished I will PM you.
Jan
Re: SD restoration
Happy new year to those who are already celebrating.
I reassembled the magneto using a spare set of points as per Hugz's suggestion, but still no spark at all. Put a meter across, and it is as dead as a now extinct flightless bird. It is an ex magneto, it has ceased to be.
However I then removed the cylinder and checked for water flow, no problem at all! Compression previously noted to be reasonable. The general condition is good with some light scoring on the piston and bore and some rusty sludge at the top of the bore. The crank has some light corrosion, but that will clean off. I think this engine is going to be a corker! Now on the subject of corks, I have one to remove from a bottle Cheers!
I reassembled the magneto using a spare set of points as per Hugz's suggestion, but still no spark at all. Put a meter across, and it is as dead as a now extinct flightless bird. It is an ex magneto, it has ceased to be.
However I then removed the cylinder and checked for water flow, no problem at all! Compression previously noted to be reasonable. The general condition is good with some light scoring on the piston and bore and some rusty sludge at the top of the bore. The crank has some light corrosion, but that will clean off. I think this engine is going to be a corker! Now on the subject of corks, I have one to remove from a bottle
- Attachments
-
- Zinc coating still in place
-
- Looking up the bore
Re: SD restoration
Just for interest here's how your original points would have looked like. They are a bitch to adjust. Re your tiller handle why not make something up that will bolt to the nearest two crankcase bolts. ie a small spade, anglegrind the blade down to fit and drill two holes.... throttle lever can attach to shortened handle. That would be the Aussie way 
- Attachments
-
- Courtesy of http://www.villiersparts.co.uk/ignition.html
Re: SD restoration
My magneto is going of to Villiers Parts this week for George to take a look at it. That means I'm down to the final parts to strip
The alloy exhaust casting is in reasonable condition, apart from a little evidence of some butcher wacking it with a hammer.
As a replacement vertical leg is available I'm thinking about the best way to strip this down without any risk of damage to the alloy casting. A friend has offered to cut the leg and carefully machine out the remains of the leg without damaging the alloy. Has anybody done this before?[attachment=0]exhaust casting.jpg
- Attachments
-
- exhaust casting.jpg (130.28 KiB) Viewed 5636 times
-
Horsley-Anarak
- Posts: 2838
- Joined: Thu Aug 07, 2008 8:42 pm
- Location: Surrey
Re: SD restoration
I have never needed to machine the leg out from the ali casting.
Hold the drive tube in a vice, warm up the water pump housing with a blow lamp, then bash it off using a hammer and a piece of hard wood.
You can spread the clamping part of the housing by reversing the bolt and using a washer in the gap, then wind in the bolt gently.
Do it gently or you may break the casting.
Or you can tap a wedge in the gap at the top of the housing where the bolt clamps.
Heating it up soon gets it on the move I find.
Good luck
H-A
P.S. If there is hammer damage to the ali casting. Before you start filing, you can reduce the damage with a small hammer.
Gently tap the edges of the gamaged area, this will reduce the size o the dent.
Re: SD restoration
I've been having the same problem. Where did you source a replacement drive tube from?
Hugo.
Hugo.

Re: SD restoration
The heat is nimportant. I've seen two where the zinc coating (or at least some soft metal or solder or the like) appears to have been used to take up any clearance.
Heat will melt it and allow you to remove the tube.
Heat will melt it and allow you to remove the tube.
Re: SD restoration
Ahhh...... that would explain it. Thanks Charles. Tell you what, getting a new rubber coupling on is not too easy. Shame the waterpump spigot and pipe aren't the same diameter. Any tricks?
- Attachments
-
- Reinforced fuel line.
-
Charles uk
- Posts: 4977
- Joined: Wed Feb 27, 2008 4:38 pm
- Location: Maidenhead Berks UK
Re: SD restoration
The right size pipe & heat the new pipe in Very hot water.
Make it idiot proof and someone will make a better idiot.
Re: SD restoration
Thanks for the suggestions gents, I will give it a very careful go later and report back. Heat and careful opening of the clamp using the pinch bolt...
Hugz - For the SD Jan has been very helpful and offered a post war leg which is the right size.
As an aside, when my current SD and follow on AD projects are completed, I'm thinking about trying some leg repair projects. Cutting out the old corroded leg and inserting a new length of tube, which the user could then cut to length to suit the engine.
Has this been tried before?
-
Charles uk
- Posts: 4977
- Joined: Wed Feb 27, 2008 4:38 pm
- Location: Maidenhead Berks UK
Re: SD restoration
Yes but the tube is very expensive, 1 1/8 by 12 gauge seamless mild steel tube. only available in 20 foot lengths.
The only supplier I could find was Hub le Bass somewhere up your way, I had to get someone else to buy, it on the back of their order, as I think it was a £125 minimum order value + delivery, direct from them.
Here's the only one I haven't used, which I chrome plated for an ON.
Your looking at spending a lot of time & money for a drive shaft tube,
Piece of tube £10 +
Turn out old tube from top casting ?
Drill 2 through vent holes & 1 grease nipple hole ?
Braize top casting on new tube ?
Polish & zinc plate £20
Ensure that the ID of the tube is a good fit for the bronze cotton reel pinion shaft bush.
- Attachments
-
Make it idiot proof and someone will make a better idiot.
Re: SD restoration
Hello Charles, a friend who has converted his garage into a workshop with lathe and milling machine has offered to help with machining, and I will hunt around to try and obtain some tubing. This is a longer term project though.
Back to the SD, I have been perusing what to do with the block, which is in fairly good condition, with good water flow also. Most of the zinc coating is in place, should I leave it as is, or are you aware of any paint finishes that could replicate the original zinc coating?
I'm leaning towards leaving the finish as is at the moment.