Hi AusAnzani, better late than never.
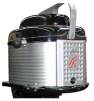
The original cover I referred to was sold with another motor so here's another one I whipped up over the last few days which will be part of an AD. Eventually. It was at least as nasty as yours, heavily oxidised with no paint remaining in the lettering - very manky.
The first step was a scrub with abrasive paper backed onto a wooden pad. I used WD40 to lubricate the paper, then did a second pass with metal polish.
Next I masked up the areas I didn't want paint on because all I had to hand was a tin of car paint. This was a bit approximate, just so when I sprayed paint it didn't go absolutely all over it.
After the paint had a chance to go off I went over it again with abrasive paper and polish just to take off any paint from the surface but leave it in the lettering.
I tested the notion that putting it to the buffer wheel would not affect the lettering. Some paint came off notably at the ends of the arrow, and it also took the gloss off, but for the most part as you can see it worked ok.
Flash photography really brings out all the imperfections in the metal - all the pitting shows up very well! However it looks much better to the eye than in the picture, although I'm sure things could be improved with a bit more effort. Wish I'd taken a 'before' photo though. Ah well.
In hindsight:
• I expect enamel paint of the sort used by Airfix kit modellers would be better than spray paint.
• Polish the surface to the desired finish first - it makes the removal of excess paint much easier.
• In an ideal world use brake cleaner to degrease, especially if you have used wax polish on your buffing wheel.
• If you are not using spray paint, a toothpick is an easier tool than a brush.
• Perhaps another method might be to put some paint into a sponge and swab it across the lettering.
• It may be possible to use a razor blade to effectively remove excess.
If you make a complete muck of it and want to start again use thinners to remove any paint easily, even after it has dried. There's not much at risk here.