
I will keep you guys posted as I proceed as its always good to have photographic documentation of a restoration, we all like photos!
The next project
Moderators: John@sos, charlesp, Charles uk, RickUK, Petergalileo
The next project
Well, I find myself out of action with a torn knee ligament, maybe getting too old for this surfing lark... So, with my 8 year old asking me every other day about spending some quality time with him I suggested a seagull restoration that we could document as well as him helping me from start to finish, he loved the idea. We spoke about the type of restoration we were going to undertake, cosmetic or total.... Total won so I dug out a Marston ON long shaft, seized but fairly complete, I will have to make a tank for it, cast some new thumb screws and pressure pads for the transom mount, chrome the nesseccary parts and source a few other bits that are required, the motor cost me very little so I don't mind spending a bit on it. I estimate this project will take the winter which is great as the Doctor told me the knee will take 4-6 months 
I will keep you guys posted as I proceed as its always good to have photographic documentation of a restoration, we all like photos!
I will keep you guys posted as I proceed as its always good to have photographic documentation of a restoration, we all like photos!
- Attachments
-
-
-

Re: The next project
Excellent! Great project to get a youngster involved with. I remember being about 10 or so and my dad saying that he needed my help to strip a mini rear subframe out and build up the new one. I was made up, and spent the next couple of weekends getting very dirty. 
Re: The next project
Ps sorry to hear about the knee..
-
Collector Inspector

- Posts: 4182
- Joined: Sun Jun 29, 2008 4:32 am
- Location: Perth Western Australia
- Contact:
Re: The next project
Cracking project!
You can have a "Knees-up" when finished.
I will follow progress.
BnC
You can have a "Knees-up" when finished.
I will follow progress.
BnC
A chicken is one egg's way of becoming others
-
headdownarseup
- Posts: 2484
- Joined: Thu Apr 04, 2013 2:26 pm
- Location: bristol
Re: The next project
Yep nice project Rene.
Good that you've thought about sharing your experience with others on here.
Easy does it with the knee. (my right knee dislocates quite often these days so i know what you're going through)
Plenty of pics..
Jon
Good that you've thought about sharing your experience with others on here.
Easy does it with the knee. (my right knee dislocates quite often these days so i know what you're going through)
Plenty of pics..
Jon
Re: The next project
Great project for you and your boy to do together.
Look forward to the updates.
Regards,
Look forward to the updates.
Regards,
www.vintageoutboardsaustralia.blogspot.com
Re: The next project
Well the weather was good and the motor had been soaking in diesel for several days now so I thought it would be a good time for the strip down. I de-greased everything and washed it all down, thanks to the soak in diesel, nearly everything came apart as it should, these motors really are well made. One tricky thing on a Marston that no other seagull has is that the driveshaft is round not square section and uses inlaid keys so the procedure for removal of the gear box is different, once the powerhead is off and the round driveshaft removed you are unable to remove the Gearbox because the pinion shaft has a key in it and will not fit through the bush at the base of the driveshaft tube, you have to knock the key out (its not a tight fit) but can take time to do.
- Attachments
-
-
-
-
Re: The next project
More photos, motor in pieces. The method I use to remove the pump housing is once I remove the pinch bolt I thread it back in the other threaded side, I put a washer in the split and as I wind the bolt it spreads the flange, a little heat and the pump housing virtually falls off, every time.
The exhaust tube must have got too hot at one time and was cracked and holed at the top, so a new tube will need to be sourced, a new tank will need to be found or fabricated as well as a fuel tap. The transom mount also needs the thumb screws making up.
An interesting thing is the quality of the components, the drive shaft and the water feed pipe are chromed even though you cannot see them.
- Attachments
-
-
-
-
-
Re: The next project
The motor was siezed so I was unable to check the gearbox and I was expecting the worst, been there before, siezed, rusted, worn out with dry powder inside...... Not this time, with the gearbox removed it was really smooth with no play in any of the bearings, stripping it down was a doddle and it was packed with emulsified oil, the pinion and crown wheel are good, there is no play in the pinion bearing so even though I was going to completely strip this motor, there is no point in removing the pinion only risk. The drive for the prop is missing, the prop was held on and driven by a split pin that some previous owner fitted by drilling the prop and through the prop shaft, messy but did the job, I will have to find or make a drive.
- Attachments
-
-
-
-
Re: The next project
The motor was siezed and with the rarity of these motors I cannot afford to damage a cylinder, this was stripped down to block, piston and rod. It had been soaked for three days in diesel, I cleaned up the bore I could see, the piston was stuck at the bottom of the stroke, I then heated the cylinder/piston and using a press I pushed the piston further into the bore to un-seize. With a wooden dowel through the plug hole I gently pressed the piston out, the plug hole is offset on these cylinders so the wooden dowel pushes the piston on the meaty part of the crown, it came apart well, a quick clean up reveals all the components are serviceable, new piston rings will be fitted though. On the bottom photo you can see the round end of the crank with the laid in key slot.
- Attachments
-
-
-
-
-
Re: The next project
Nice job Rene!
I'm curious what you intend to do with the Rusty crank? Can it be saved? If not could it be metal sprayed and ground back to size? That's a common repair in the aero engine world.
I'm curious what you intend to do with the Rusty crank? Can it be saved? If not could it be metal sprayed and ground back to size? That's a common repair in the aero engine world.
Re: The next project
Hello Adrian, I have had cams spray welded and ground/reprofiled before with great success and I think is a great way to recover cast components but in this case I recon the crank will survive, it was not really rusty just covered in crud when I cleaned it up it came up pretty well, there are a few black marks on the bearing surface but nothing I can feel with my nail, I'll check to make sure it's dimensionally correct, if so I'll re-use it. Once everything is cleaned up I'll assess it all.
The problem with any restoration is how far do you go, if you try for perfection you will end up with a motor made up from new and remaufactured components with very little original on the other hand with a motor that is nearly 80 years old do I really want to polish and rub away its past? I will try to keep the motor as original as I can without compromising its reliability. This motor has done a lot of work judging by the wear on the drive shaft tube where it rubs against the transom bracket but it has also been well maintained, it looks like it's had new gearbox bearings and main bearings not that long ago as there is zero play in these, which helps me, shame it spent the last 25 years outside though!
The problem with any restoration is how far do you go, if you try for perfection you will end up with a motor made up from new and remaufactured components with very little original on the other hand with a motor that is nearly 80 years old do I really want to polish and rub away its past? I will try to keep the motor as original as I can without compromising its reliability. This motor has done a lot of work judging by the wear on the drive shaft tube where it rubs against the transom bracket but it has also been well maintained, it looks like it's had new gearbox bearings and main bearings not that long ago as there is zero play in these, which helps me, shame it spent the last 25 years outside though!
Re: The next project
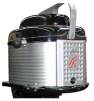
Well, it's been slow but steady progress, all the studs had quite a bit of corrosion, too much in fact, 20 odd years outside I guess so decided to make a complete set of studs out of stainless and semi polish them, I hate using stainless on these motors but sometimes it makes life easier and you only get to see the very ends anyway.
The crank has come up well not perfect but the marks you can see cannot be felt and dimensionally it's perfect with no signs of wear, as is the big end.
The cases have come up well, clean and not too shiny.
The block has had several sessions in the ultra sonic cleaner, a friends suggested white spirit and I've got to say it turned like gravy, blew and flushed out and waterways which look clear with a lot of lumps coming out, a quick light hone to clean the bore all looks good with no marks, measure the bore, round and parallel just as it should be.
De-grease, mask up and paint using hammerite smooth, I use this paint often as it handles the temperature well and is resistant to petrol.
Now the piston to look at, I've got some new old stock wartime SD rings, still in the tar paper and covered in a tar like wax, I got a few sets when I could and they are top quality, so much better than the modern rings that are now available. The piston is a mess though, my next job.
- Attachments
-
-
-
-
-
Collector Inspector
- Posts: 4182
- Joined: Sun Jun 29, 2008 4:32 am
- Location: Perth Western Australia
- Contact:
Re: The next project
Certainly lookn the goods here............
I stocked up with the old rings from John ages ago and yes they are of "More Stirling Stuff" IMO.
Good work.
BnC
I stocked up with the old rings from John ages ago and yes they are of "More Stirling Stuff" IMO.
Good work.
BnC
A chicken is one egg's way of becoming others
-
headdownarseup
- Posts: 2484
- Joined: Thu Apr 04, 2013 2:26 pm
- Location: bristol
Re: The next project
Excellent work so far Rene.
Very nice indeed (jealous)
I've started using hammerite paint on some of my gulls too. Good strong durable finish with this paint, and if it were ever needed could be "dulled" down a tad for that not so shiny look.
Dads and sons together in this. I hope your boy is making himself useful when asked.
Jon